HP Vectra VEi8 HP Vectra VEi7, Troubleshooting and Upgrade Guide - Page 52
Installing a Second Hard, Drive, bays see Installing and Upgrading Removable Media Devices
 |
View all HP Vectra VEi8 manuals
Add to My Manuals
Save this manual to your list of manuals |
Page 52 highlights
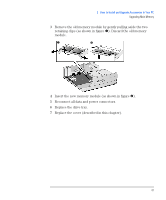
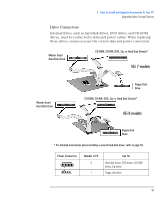
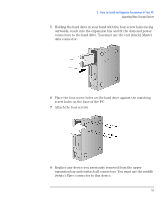
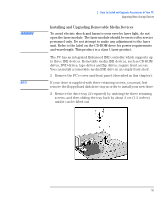
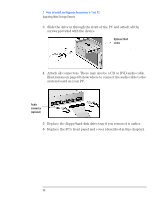
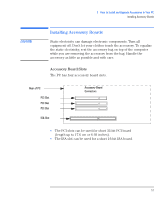
2 How to Install and Upgrade Accessories In Your PC Upgrading Mass Storage Devices 4 Slide the new hard drive into the drive tray (with the correct orientation) and tighten the screws. 5 Attach all data and power connectors. 6 Replace the cover (described in this chapter). 7 Check the new configuration in the Setup program, accessed by pressing F2 at startup. Installing a Second Hard To install a second hard drive: Drive NOTE The second hard drive is installed in the lower expansion bay. If this bay already contains another device, for example, a CD-RW or Zip drive, you must remove it in order to install a second hard drive. NOTE 1 Remove the computer's cover and front panel (described in this chapter). 2 Remove any installed devices from the upper and lower expansion bays (see "Installing and Upgrading Removable Media Devices" on page 55). 3 Fit the new data cable to the 2ND IDE connector on the system board. HP cannot guarantee that a second hard drive will function properly if you use the IDE cable originally provided with your PC. You must use a special shielded cable with the "Master" connector at the end. This cable can be ordered on the Web from www.hp.com/go/pcaccessories. 4 Stand the PC on its left side on a flat surface. 52
-
 1
1 -
2
-
3
-
4
-
5
-
6
-
7
-
8
-
9
-
10
-
11
-
12
-
13
-
14
-
15
-
16
-
17
-
18
-
19
-
20
-
21
-
22
-
23
-
24
-
25
-
26
-
27
-
28
-
29
-
30
-
31
-
32
-
33
-
34
-
35
-
36
-
37
-
38
-
39
-
40
-
41
-
42
-
43
-
44
-
45
-
46
-
 47
47 -
 48
48 -
 49
49 -
 50
50 -
 51
51 -
 52
52 -
 53
53 -
 54
54 -
 55
55 -
 56
56 -
 57
57 -
58
-
59
-
60
-
61
-
62
-
63
-
64
-
65
-
66
-
67
-
68
-
69
-
70
-
71
-
72
-
73
-
74
-
75
-
76
-
77
-
78
-
79
-
80
 |
 |