HP XM600 hp kayak xm600 series 1, user's guide for minitower models - Page 45
Installing an Accessory in the Front Access Cage
 |
View all HP XM600 manuals
Add to My Manuals
Save this manual to your list of manuals |
Page 45 highlights
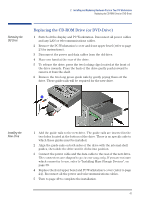
2 Installing and Replacing Hardware Parts in Your PC Workstation Installing an Accessory in the Front Access Cage Installing an Accessory in the Front Access Cage 1 Switch off the display and PC Workstation. Disconnect all power cables and any LAN or telecommunications cables. 2 Remove the PC Workstation's cover and front upper bezel (refer to page 23 for instructions). 3 Depending on the accessory to be installed, either: a Remove the 5.25-inch metal filler plate. Through the filler plate opening located on the left-hand side of the filler plate, use your index finger to leverage the plate from the PC chassis. b Break off the 3.5-inch metal filler plate from the PC chassis. You need to use a screwdriver to help you to unlatch the plate. First unlatch the filler from one side, and then pull it out. In either case, be very careful not to hurt your fingers when you remove the filler plate. 4 If the new drive is a 3.5-inch hard disk drive, use the supplied 5.25-inch tray installed in the middle shelf of the front access cage. Four screws are also supplied to secure the hard disk drive to the tray. CD-ROM drives, DVD drives, etc., do not require a tray, but require rails to be installed in the PC Workstation. These guide rails are inserted in the two holes located at the bottom of the drive. Depending on the device, different colored guide rails are required, and in some cases the guide rails are labeled "L" for left-hand side and "R" for right-hand side installation. Refer to the table on page 41. 45
-
 1
1 -
2
-
3
-
4
-
5
-
6
-
7
-
8
-
9
-
10
-
11
-
12
-
13
-
14
-
15
-
16
-
17
-
18
-
19
-
20
-
21
-
22
-
23
-
24
-
25
-
26
-
27
-
28
-
29
-
30
-
31
-
32
-
33
-
34
-
35
-
36
-
37
-
38
-
39
-
 40
40 -
 41
41 -
 42
42 -
 43
43 -
 44
44 -
 45
45 -
 46
46 -
 47
47 -
 48
48 -
 49
49 -
 50
50 -
51
-
52
-
53
-
54
-
55
-
56
-
57
-
58
-
59
-
60
-
61
-
62
-
63
-
64
-
65
-
66
-
67
-
68
-
69
-
70
-
71
-
72
-
73
-
74
-
75
-
76
-
77
-
78
-
79
-
80
-
81
-
82
-
83
-
84
-
85
-
86
-
87
-
88
-
89
-
90
-
91
-
92
-
93
-
94
-
95
-
96
-
97
-
98
 |
 |
