HP XM600 hp kayak xm600 series 1, user's guide for minitower models - Page 67
System Info., Boot Steps, Diags, RAM Module - kayak memory capacity
 |
View all HP XM600 manuals
Add to My Manuals
Save this manual to your list of manuals |
Page 67 highlights
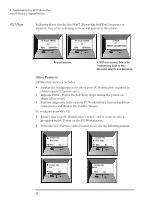
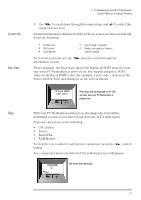
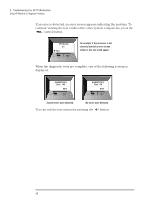
System Info. Boot Steps 3 Troubleshooting Your HP PC Workstation Using HP MaxiLife to Diagnose Problems 3 Use to scroll down through the menu items and required menu item. to select the System information is displayed on the LCD one screen at a time and should detail the following: • Product name • BIOS version • Serial Number • Type & speed of processor • Number and capacity of memory modules installed To view these details, use the information screens. button to scroll through the Where available, the Boot steps option will display all POST steps the next time your PC Workstation is powered on. For support purposes, POST steps are shown as POST codes (for example, a post code = step xx in the Power-On Self Test) and displayed on the LCD as follows: HP Kayak XU800 POST Code xx Post steps will be displayed on the LCD the next time your PC Workstation is powered on. Diags With your PC Workstation powered on, the diagnostic tests will be performed as soon as you select Diags from the LCD's main menu. Tests are carried out on the following: • CPU Socket • Power • Board PLL • RAM Module To view the test results for each system component, press the button. control If no component errors are detected, the following screen will appear. COMPONENT Next No errors were detected. 67
-
 1
1 -
2
-
3
-
4
-
5
-
6
-
7
-
8
-
9
-
10
-
11
-
12
-
13
-
14
-
15
-
16
-
17
-
18
-
19
-
20
-
21
-
22
-
23
-
24
-
25
-
26
-
27
-
28
-
29
-
30
-
31
-
32
-
33
-
34
-
35
-
36
-
37
-
38
-
39
-
40
-
41
-
42
-
43
-
44
-
45
-
46
-
47
-
48
-
49
-
50
-
51
-
52
-
53
-
54
-
55
-
56
-
57
-
58
-
59
-
60
-
61
-
 62
62 -
 63
63 -
 64
64 -
 65
65 -
 66
66 -
 67
67 -
 68
68 -
 69
69 -
 70
70 -
 71
71 -
 72
72 -
73
-
74
-
75
-
76
-
77
-
78
-
79
-
80
-
81
-
82
-
83
-
84
-
85
-
86
-
87
-
88
-
89
-
90
-
91
-
92
-
93
-
94
-
95
-
96
-
97
-
98
 |
 |
