Honeywell HJC4000 User Guide - Page 32
Step 2: Con the UltraKey Touch for DVR Use, Serial Port RS232, Network, Cable, RS232-RS485
 |
View all Honeywell HJC4000 manuals
Add to My Manuals
Save this manual to your list of manuals |
Page 32 highlights
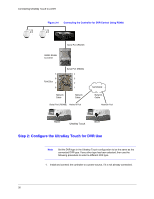
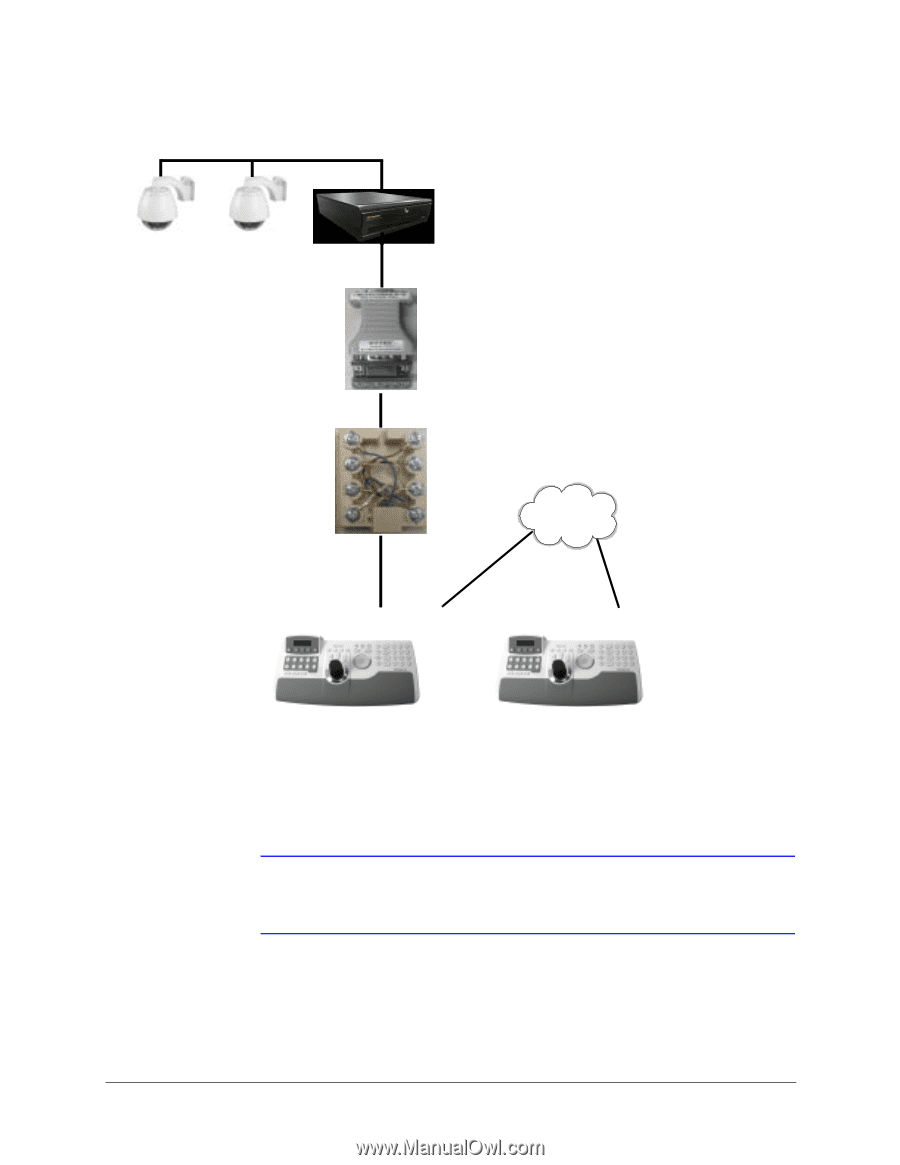
Connecting UltraKey Touch to a DVR Figure 3-4 Connecting the Controller for DVR Control Using RS485 RS232-RS485 Converter Serial Port (RS232) 5 6 RJ45 Box 7 8 Serial Port (RS485) 4 3 2 1 Network Cable Network Cable Serial Port (RS485) Network Port NETWORK Network Cable Network Port Master UltraKey Touch Slave1 Step 2: Configure the UltraKey Touch for DVR Use Note Set the DVR type in the Ultrakey Touch configuration to be the same as the connected DVR type. If any other type has been selected, then use the following procedure to select a different DVR type. 1. Install and connect the controller to a power source, if it is not already connected. 32
-
 1
1 -
2
-
3
-
4
-
5
-
6
-
7
-
8
-
9
-
10
-
11
-
12
-
13
-
14
-
15
-
16
-
17
-
18
-
19
-
20
-
21
-
22
-
23
-
24
-
25
-
26
-
 27
27 -
 28
28 -
 29
29 -
 30
30 -
 31
31 -
 32
32 -
 33
33 -
 34
34 -
 35
35 -
 36
36 -
 37
37 -
38
-
39
-
40
-
41
-
42
-
43
-
44
-
45
-
46
-
47
-
48
-
49
-
50
-
51
-
52
-
53
-
54
-
55
-
56
-
57
-
58
-
59
-
60
-
61
-
62
-
63
-
64
-
65
-
66
-
67
-
68
-
69
-
70
-
71
-
72
-
73
-
74
-
75
-
76
-
77
-
78
 |
 |
32
Connecting UltraKey Touch to a DVR
Figure 3-4
Connecting the Controller for DVR Control Using RS485
Step 2: Configure the UltraKey Touch for DVR Use
Note
Set the DVR type in the Ultrakey Touch configuration to be the same as the
connected DVR type. If any other type has been selected, then use the
following procedure to select a different DVR type.
1.
Install and connect the controller to a power source, if it is not already connected.
Serial Port (RS232)
Serial Port (RS485)
Network
Cable
Serial Port (RS485)
UltraKey Touch
RS232-RS485
Converter
RJ45 Box
Master
Slave1
Network
Cable
Network
Cable
Network Port
Network Port
NETWORK
5
4
3
2
1
6
7
8