Honeywell HJC4000 User Guide - Page 47
Slider_Left/Right, Slider_Left
 |
View all Honeywell HJC4000 manuals
Add to My Manuals
Save this manual to your list of manuals |
Page 47 highlights
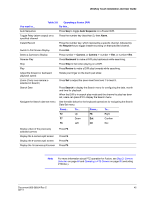
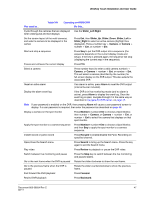
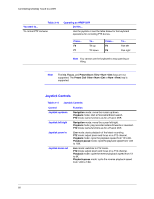
UltraKey Touch Installation and User Guide You want to... Table 3-9 Operating an HRXD DVR Do this... Cycle through the cameras that are displayed when viewing 2x2 and 3x3 displays Use the Slider_Left/Right. Set the screen layout of the multi-cameras, and select a camera to be displayed in the cameo Press Ent, then Slider_Up, Slider_Down, Slider_Left or Slider_Right to select an active camera (highlight box displayed). Press a number key + Camera, or Camera + number + Ent, or number + Ent. Start and stop a sequence Press Seq to put the DVR output into a sequence (the sequence depends on the current display mode and setup). If the key is pressed again, the sequence will stop (displaying the current step in the sequence). Freeze and unfreeze the current display Press F10. Select a camera Press number keys (to enter a valid camera number) + Camera, or Camera + number + Ent, or number + Ent. This will select a camera (identified by the number) for full-screen display on the DVR output. This also selects the associated DVR. Reset an active alarm If an alarm is active, press Alarm to reset the DVR output (internal buzzer included). Display the alarm event log If the DVR is in live monitoring mode (and no alarm is active), press Alarm to display the event log. Once the event log is open, navigate through it in the same way as described in Navigate the DVR menus, on page 46. Note If user password is enabled on the DVR, then pressing Alarm will cause a user password screen to display. If a user password is required, then enter the password as described on page 46. Display a camera on the spot monitor Press Monitor+number+Ent to choose a Spot Monitor, then number + Camera, or Camera + number + Ent, or number + Ent to select the camera that displays on that spot monitor. Apply the spot monitor to a camera sequence Press Monitor+number+Ent to choose a Spot Monitor, and then Seq to apply the spot monitor to a camera sequence. Instant record or panic record Press Recycle to enable/disable the Panic Recording on specified channel. Open/close the Search menu Press Search to bring up the Search menu. Press the key again to exit the Search menu. Play video Press Review to playback or pause the DVR video. Switch between live monitoring and pause Press the Stop key to switch between the live monitoring and paused states. Go to the next frame when the DVR is paused Rotate the slider clockwise to show the next frame. Go to the previous frame when the DVR is paused Rotate the slider counterclockwise to show the previous frame. Fast forward the DVR playback Press Forward. Rewind DVR playback Press Backward. Document 800-06554 Rev C 47 02/11
-
 1
1 -
2
-
3
-
4
-
5
-
6
-
7
-
8
-
9
-
10
-
11
-
12
-
13
-
14
-
15
-
16
-
17
-
18
-
19
-
20
-
21
-
22
-
23
-
24
-
25
-
26
-
27
-
28
-
29
-
30
-
31
-
32
-
33
-
34
-
35
-
36
-
37
-
38
-
39
-
40
-
41
-
 42
42 -
 43
43 -
 44
44 -
 45
45 -
 46
46 -
 47
47 -
 48
48 -
 49
49 -
 50
50 -
 51
51 -
 52
52 -
53
-
54
-
55
-
56
-
57
-
58
-
59
-
60
-
61
-
62
-
63
-
64
-
65
-
66
-
67
-
68
-
69
-
70
-
71
-
72
-
73
-
74
-
75
-
76
-
77
-
78
 |
 |