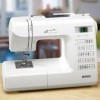
Kenmore 19110 Owners Manual - Page 23
GETTING, READY, Controlling, Sewing, Speed - foot control
 |
UPC - 883073000043
View all Kenmore 19110 manuals
Add to My Manuals
Save this manual to your list of manuals |
Page 23 highlights
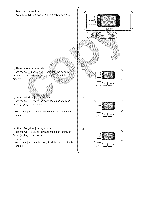
SECTION 2. GETTING READY TO SEW Connecting the Power Supply 1. Turn the power switch OFF. 2. Insert the foot control plug into the machine socket. 3. Insert the machine plug into the machine socket. 4. Insert the power supply plug into the outlet. 5. Turn the power switch ON. 6. The LED display will show "01" (straight stitch) after one second. _i_ Power switch _2_ Foot controll plug _3_Machine socket _4_Machine plug _5_Power supply plug _6_Outlet Before Using Your Sewing Mach" Before using your sewing machine place a piece of waste fabric foot and run the machine with minutes. Wipe away any oil For Your * While in sewing are_ as the * Always tur the power -- When -- When atti -- When * Do not place sewing. lever, le power machi and unplug from )arts. control when not Controlling Sewing Speed Speed control lever: You can set the maximum sewing speed by the speed control lever. _i_ Slide the lever to the right for higher speed. _2_ Slide the lever to the left for slower speed. Foot Controller Model 21249 is used with Sewing Machine Model 385.19110.xxx (xxx represents numbers 000 through 999). Foot control: Sewing speed is varied by the foot control. The harder you depress the foot control, the faster the machine runs. CAUTION: Do not place anything on the foot control when the machine is not in use. Polarized Plug This appliance has a polarized plug (one blade wider than the other). To reduce the risk of an electric shock, this plug is intended to fit in a polarized outlet only one way. If the plug does not fit in the outlet, reverse the plug. If it still does not fit, contact a qualified electrician to install the proper outlet. Do not modify the plug in any way. m===lliili (())
-
 1
1 -
2
-
3
-
4
-
5
-
6
-
7
-
8
-
9
-
10
-
11
-
12
-
13
-
14
-
15
-
16
-
17
-
 18
18 -
 19
19 -
 20
20 -
 21
21 -
 22
22 -
 23
23 -
 24
24 -
 25
25 -
 26
26 -
 27
27 -
 28
28 -
29
-
30
-
31
-
32
-
33
-
34
-
35
-
36
-
37
-
38
-
39
-
40
-
41
-
42
-
43
-
44
-
45
-
46
-
47
-
48
-
49
-
50
-
51
-
52
-
53
-
54
-
55
-
56
-
57
-
58
-
59
-
60
-
61
-
62
-
63
-
64
-
65
-
66
-
67
-
68
-
69
-
70
-
71
-
72
-
73
-
74
-
75
-
76
-
77
-
78
-
79
-
80
-
81
-
82
-
83
-
84
-
85
-
86
-
87
-
88
-
89
-
90
-
91
-
92
-
93
-
94
-
95
-
96
-
97
-
98
-
99
-
100
-
101
-
102
-
103
-
104
-
105
 |
 |
