Kenmore 19110 Owners Manual - Page 95
Of Your
 |
UPC - 883073000043
View all Kenmore 19110 manuals
Add to My Manuals
Save this manual to your list of manuals |
Page 95 highlights
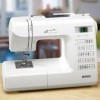
SECTION 6. CARE OF YOUR MACHINE Adjusting Stretch Stitch Balance The sewing results of the stretch stitch patterns may vary depending upon the sewing conditions, such as sewing speed, type of the fabric, number of layers, etc. Always make test sewing on a scrap piece of the fabric that you wish to use. _i_ Stretch stitch balancing dial _2_Standard setting mark _3_ Groove 34 Example: (Stitch pattern _ ) (A)lf the pattern is compressed, turn the stretch balancing dial in the direction of "+". (C)lf the pattern is drawn out, turn the stretch stitch balancing dial in the direction of NOTE: In normal sewing, set the dial i.e. the groove on the dial is c_ standard setting _: Replacing the WARNINGS: Turn OFF the power before replacing the light bulb. The bulb could be HOT, wait until it has cooled down before touching it. Open face plate cover. Pull out the light bulb. _i_ Face cover plate _2_Lamp socket _3_light bulb To insert the light bulb in the lamp socket, match the base on the light bulb with the lamp socket holes. Close face plate cover. NOTE: Replace the bulb with the same type rated 12V, 5W. Always refer to the part number #000026002 when ordering a replacement bulb. (B) (c)
-
 1
1 -
2
-
3
-
4
-
5
-
6
-
7
-
8
-
9
-
10
-
11
-
12
-
13
-
14
-
15
-
16
-
17
-
18
-
19
-
20
-
21
-
22
-
23
-
24
-
25
-
26
-
27
-
28
-
29
-
30
-
31
-
32
-
33
-
34
-
35
-
36
-
37
-
38
-
39
-
40
-
41
-
42
-
43
-
44
-
45
-
46
-
47
-
48
-
49
-
50
-
51
-
52
-
53
-
54
-
55
-
56
-
57
-
58
-
59
-
60
-
61
-
62
-
63
-
64
-
65
-
66
-
67
-
68
-
69
-
70
-
71
-
72
-
73
-
74
-
75
-
76
-
77
-
78
-
79
-
80
-
81
-
82
-
83
-
84
-
85
-
86
-
87
-
88
-
89
-
 90
90 -
 91
91 -
 92
92 -
 93
93 -
 94
94 -
 95
95 -
 96
96 -
 97
97 -
 98
98 -
 99
99 -
 100
100 -
101
-
102
-
103
-
104
-
105
 |
 |
