Kenmore 19110 Owners Manual - Page 31
Turn OFF thepow
 |
UPC - 883073000043
View all Kenmore 19110 manuals
Add to My Manuals
Save this manual to your list of manuals |
Page 31 highlights
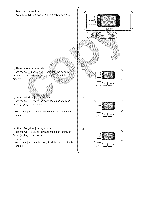
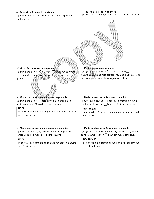
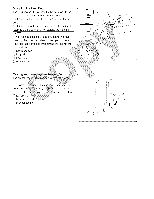
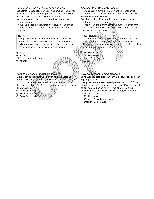
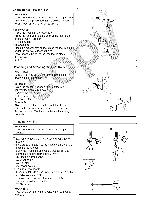
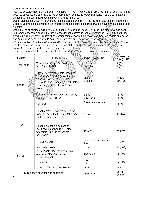
Changing the Presser Foot WARNING: Turn OFF the power switch before changing the foot. I Always use the proper foot for the selected pattern, Wrong foot can cause need e to break. • To release: Raise the needle and presser foot. Press the red button on the back of the foot holder and the foot will drop off. _i_ Red button • To snap on: Place the presser foot so the pin on the foot lies under the groove of the foot holder. Lower the foot holder to lock the foot in place. _2_Groove _3_ Pin Detaching ...... and Attaching th_ _ :gi WARNING: Turn OFF thepow _i_befd aching ........ • To detach: ..... Raise the and tu setscrew counterclock i_ _ remove ii Remove the ....... _i_ Setscrew ..... ...... _2_ Foot holder ........ ......... • To attach: Align the hole in the foot holder with the threaded hole on the presser bar and insert the setscrew through the hole. Tighten the setscrew by turning it clockwise. Changing Needles f WARNING: Turn OFF the power switch before changing the needle. [i_ Loosen the needle clamp screw and pull out the needle. [2] Insert a new needle into the needle clamp with the flat side facing back. Push the needle up against the stopper pin and tighten the needle clamp screw firmly. _i_ Needle clamp screw _2_Stopper pin _3_ Flat side _4_Power switch [31To check the needle: Place the flat side of the needle onto something fiat (needle plate, glass etc). The clearance between the needle and the fiat surface should be consistent. _5_Clearance WARNING: Never use a bent or blunt needle, which can cause it to break. / 7 .... /// //
-
 1
1 -
2
-
3
-
4
-
5
-
6
-
7
-
8
-
9
-
10
-
11
-
12
-
13
-
14
-
15
-
16
-
17
-
18
-
19
-
20
-
21
-
22
-
23
-
24
-
25
-
 26
26 -
 27
27 -
 28
28 -
 29
29 -
 30
30 -
 31
31 -
 32
32 -
 33
33 -
 34
34 -
 35
35 -
 36
36 -
37
-
38
-
39
-
40
-
41
-
42
-
43
-
44
-
45
-
46
-
47
-
48
-
49
-
50
-
51
-
52
-
53
-
54
-
55
-
56
-
57
-
58
-
59
-
60
-
61
-
62
-
63
-
64
-
65
-
66
-
67
-
68
-
69
-
70
-
71
-
72
-
73
-
74
-
75
-
76
-
77
-
78
-
79
-
80
-
81
-
82
-
83
-
84
-
85
-
86
-
87
-
88
-
89
-
90
-
91
-
92
-
93
-
94
-
95
-
96
-
97
-
98
-
99
-
100
-
101
-
102
-
103
-
104
-
105
 |
 |
