Kyocera FS-1050TN User Guide - Page 118
Send a Document to a Print Box, Custom Quality
 |
View all Kyocera FS-1050TN manuals
Add to My Manuals
Save this manual to your list of manuals |
Page 118 highlights
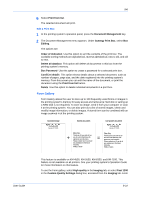
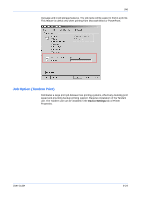
Job To use Synergy print box, in the Imaging tab printing quality must be set to High quality, Proof, or Draft; or select Fast 1200 or 600 dpi in the Custom Quality Settings dialog box. Synergy print box uses printing system memory and does not require an optional Hard disk or setting up a RAM disk. Jobs are sorted and stored in the printing system's memory rather than in physical virtual mail boxes attached to the printing system. There are 100 available print boxes, and each print box can hold up to 999 pages. To combine several jobs, send them to one box, and then print the box from the operation panel. Jobs can be sent to a print box from your computer, or scanned into the printing system and stored in the print box. Example: To combine 3 separate documents and one scanned-in page into one print job, send the 3 documents all to the same print box, and then at the printing system, scan in the page and register it in the print box. Then, use the operation panel to put the documents in the order you would like, and combine them into one print job. Send a Document to a Print Box 1 Open the document, and from the File menu select Print. 1 2 From the Print dialog box, open Properties and then select the Job tab. 2 3 In the Job tab, select Job storage (e-MPS), then select Synergy print box. 3 4 In the SPB ID box, enter a print box number. There are 100 available print boxes, numbered 1 through 100. You may want to go to the printing system's operation panel to see if the print box is empty. 4 5 At this point you have the option of giving a name to the print job, or of accepting a default name generated by the printing system. To give it a custom name, under Job name, select Custom, and then enter a name in text box. 5 6 Click OK, and then Print or OK (varies depending on the application) to send the job to the print box. 6 The print job is now stored in the printing system's memory, in a print box. Scan a Document into a Print Box 1 At the printing system's operation panel, press the Document Management key. 1 8-19 KX Driver
-
 1
1 -
2
-
3
-
4
-
5
-
6
-
7
-
8
-
9
-
10
-
11
-
12
-
13
-
14
-
15
-
16
-
17
-
18
-
19
-
20
-
21
-
22
-
23
-
24
-
25
-
26
-
27
-
28
-
29
-
30
-
31
-
32
-
33
-
34
-
35
-
36
-
37
-
38
-
39
-
40
-
41
-
42
-
43
-
44
-
45
-
46
-
47
-
48
-
49
-
50
-
51
-
52
-
53
-
54
-
55
-
56
-
57
-
58
-
59
-
60
-
61
-
62
-
63
-
64
-
65
-
66
-
67
-
68
-
69
-
70
-
71
-
72
-
73
-
74
-
75
-
76
-
77
-
78
-
79
-
80
-
81
-
82
-
83
-
84
-
85
-
86
-
87
-
88
-
89
-
90
-
91
-
92
-
93
-
94
-
95
-
96
-
97
-
98
-
99
-
100
-
101
-
102
-
103
-
104
-
105
-
106
-
107
-
108
-
109
-
110
-
111
-
112
-
 113
113 -
 114
114 -
 115
115 -
 116
116 -
 117
117 -
 118
118 -
 119
119 -
 120
120 -
 121
121 -
 122
122 -
 123
123 -
124
-
125
-
126
-
127
-
128
-
129
-
130
-
131
-
132
-
133
-
134
-
135
-
136
-
137
-
138
-
139
-
140
-
141
-
142
-
143
-
144
-
145
-
146
-
147
-
148
-
149
-
150
-
151
-
152
-
153
-
154
 |
 |
