Kyocera FS-1050TN User Guide - Page 66
Multiple s Per Sheet, Restore Defaults
 |
View all Kyocera FS-1050TN manuals
Add to My Manuals
Save this manual to your list of manuals |
Page 66 highlights
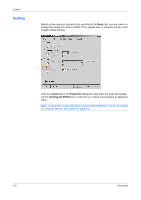
Layout 3 Select Booklet. 3 4 Choose either Left edge binding or Right edge binding. 4 To use the stapling feature, complete the following steps: 5 Click the Basic tab, and under Destination, select a face-down finishing tray. 5 If the Staple check box is not available in the Finishing tab, change the setting for Destination in the Basic tab to an output tray that has a stapler. Booklet will be selected automatically if Staple is selected in the Finishing tab and Booklet [fold] is selected under Position. Subsequently clearing the Booklet option does not reset Destination in the Basic tab. To return the driver to the default settings, click Restore Defaults. Restore Defaults is available when accessing the printer driver from the application's Print dialog box. 6 Select the number of copies to print. 6 7 Click the Finishing tab, and select the Staple check box. Booklet (fold) is selected automatically. 7 For models using an optional folding unit, in the Basic tab, select Folding tray as the output Destination. The Finishing tab will display Booklet (fold). 8 Click OK to return to the Print dialog box. 8 9 Click OK to start printing. 9 Multiple Pages Per Sheet You can print multiple pages of a document on a single sheet of paper. Pages can be arranged in a variety of ways, and a border can be printed around each document page. 1 From the application's Print dialog box, open Properties. (Select Print from the File menu, and select Properties.) 10 2 Click the Layout tab. 11 4-3 KX Driver
-
 1
1 -
2
-
3
-
4
-
5
-
6
-
7
-
8
-
9
-
10
-
11
-
12
-
13
-
14
-
15
-
16
-
17
-
18
-
19
-
20
-
21
-
22
-
23
-
24
-
25
-
26
-
27
-
28
-
29
-
30
-
31
-
32
-
33
-
34
-
35
-
36
-
37
-
38
-
39
-
40
-
41
-
42
-
43
-
44
-
45
-
46
-
47
-
48
-
49
-
50
-
51
-
52
-
53
-
54
-
55
-
56
-
57
-
58
-
59
-
60
-
 61
61 -
 62
62 -
 63
63 -
 64
64 -
 65
65 -
 66
66 -
 67
67 -
 68
68 -
 69
69 -
 70
70 -
 71
71 -
72
-
73
-
74
-
75
-
76
-
77
-
78
-
79
-
80
-
81
-
82
-
83
-
84
-
85
-
86
-
87
-
88
-
89
-
90
-
91
-
92
-
93
-
94
-
95
-
96
-
97
-
98
-
99
-
100
-
101
-
102
-
103
-
104
-
105
-
106
-
107
-
108
-
109
-
110
-
111
-
112
-
113
-
114
-
115
-
116
-
117
-
118
-
119
-
120
-
121
-
122
-
123
-
124
-
125
-
126
-
127
-
128
-
129
-
130
-
131
-
132
-
133
-
134
-
135
-
136
-
137
-
138
-
139
-
140
-
141
-
142
-
143
-
144
-
145
-
146
-
147
-
148
-
149
-
150
-
151
-
152
-
153
-
154
 |
 |
