Kyocera FS-1050TN User Guide - Page 74
Staple, Using the Stapler
 |
View all Kyocera FS-1050TN manuals
Add to My Manuals
Save this manual to your list of manuals |
Page 74 highlights
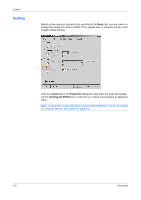
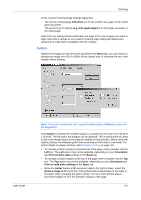
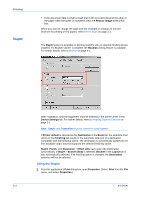
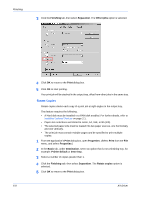
Finishing Staple • If the document data is small enough that it will not extend beyond the edge of the paper when the gutter is increased, clear the Reduce image to fit check box. When you want to change the page size (for example, to enlarge an A4-size brochure for printing on A3 paper), refer to Print Sizes on page 3-3. The Staple feature is available on printing systems with an optional finishing device installed. If a Booklet stitcher is installed, the Booklet printing feature is available. For further details, refer to Booklet on page 4-1. After installation, optional equipment must be selected in the printer driver in the Device Settings tab. For further details, refer to Installing Optional Devices on page 2-1. Note: Staple and Separation features cannot be used together. If Printer default is selected as the Destination in the Basic tab, the selection of an option in the Finishing tab results in the automatic selection of a destination compatible with that finishing option. The destination is automatically updated to the first available output tray that supports the selected finishing option. Staple, Punch, and Separation > Offset jobs each select the Destination automatically. If Staple > Booklet [fold] is selected, Booklet in the Layout tab is also automatically selected. If he finishing option is changed, the Destination selection will not be affected. Using the Stapler 1 From the application's Print dialog box, open Properties. (Select Print from the File menu, and select Properties.) 1 5-4 KX Driver
-
 1
1 -
2
-
3
-
4
-
5
-
6
-
7
-
8
-
9
-
10
-
11
-
12
-
13
-
14
-
15
-
16
-
17
-
18
-
19
-
20
-
21
-
22
-
23
-
24
-
25
-
26
-
27
-
28
-
29
-
30
-
31
-
32
-
33
-
34
-
35
-
36
-
37
-
38
-
39
-
40
-
41
-
42
-
43
-
44
-
45
-
46
-
47
-
48
-
49
-
50
-
51
-
52
-
53
-
54
-
55
-
56
-
57
-
58
-
59
-
60
-
61
-
62
-
63
-
64
-
65
-
66
-
67
-
68
-
 69
69 -
 70
70 -
 71
71 -
 72
72 -
 73
73 -
 74
74 -
 75
75 -
 76
76 -
 77
77 -
 78
78 -
 79
79 -
80
-
81
-
82
-
83
-
84
-
85
-
86
-
87
-
88
-
89
-
90
-
91
-
92
-
93
-
94
-
95
-
96
-
97
-
98
-
99
-
100
-
101
-
102
-
103
-
104
-
105
-
106
-
107
-
108
-
109
-
110
-
111
-
112
-
113
-
114
-
115
-
116
-
117
-
118
-
119
-
120
-
121
-
122
-
123
-
124
-
125
-
126
-
127
-
128
-
129
-
130
-
131
-
132
-
133
-
134
-
135
-
136
-
137
-
138
-
139
-
140
-
141
-
142
-
143
-
144
-
145
-
146
-
147
-
148
-
149
-
150
-
151
-
152
-
153
-
154
 |
 |
