Kyocera FS-1050TN User Guide - Page 128
Add Watermark, Additional Text Options, Fonts, Publishing, Count, Watermark name, Select watermark
 |
View all Kyocera FS-1050TN manuals
Add to My Manuals
Save this manual to your list of manuals |
Page 128 highlights
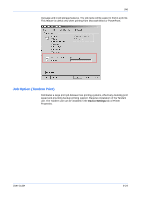
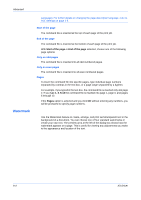
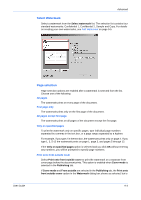
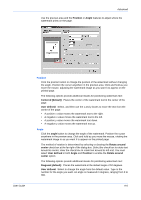
Advanced disabled. This is because cover printing is already enabled by the two Publishing tab selections. In the Publishing tab you can also select different media for the cover than that used for the rest of the print job. For further details, see Printing with Covers on page 7-1. Add Watermark You can create your own custom watermarks with different fonts, styles, colors, sizes, positions, and angles. You can also set Count to have the watermark appear multiple times on the page. 1 Click Add to open the Add Watermark dialog box. 1 2 Type a descriptive name for your watermark in the Watermark name text box. The name can be different from the actual watermark text. After the new watermark is added, the name appears in the Select watermark list. 2 3 Type the text you want to print as a watermark in the Watermark text box. Your text will appear in the preview area at the left of the dialog box. 3 4 To add the new custom watermark, click OK. To exit the dialog box without saving the watermark, click Cancel. 4 Additional Text Options Fonts Select a font for the new watermark from the Font list, and select a font style, color, and size. In the Count box, type in the number of watermarks to appear on a page, from 1 to 20. Selecting a number greater than 1 in Count enables the Spacing option. Type In a number for the distance between multiple watermarks, in tenths of an inch or millimeters. The unit (inches or millimeters) is selected in the User Settings dialog box, accessed from the Device Settings tab. For further details on changing the unit, refer to User Settings on page 2-4. 9-5 KX Driver
-
 1
1 -
2
-
3
-
4
-
5
-
6
-
7
-
8
-
9
-
10
-
11
-
12
-
13
-
14
-
15
-
16
-
17
-
18
-
19
-
20
-
21
-
22
-
23
-
24
-
25
-
26
-
27
-
28
-
29
-
30
-
31
-
32
-
33
-
34
-
35
-
36
-
37
-
38
-
39
-
40
-
41
-
42
-
43
-
44
-
45
-
46
-
47
-
48
-
49
-
50
-
51
-
52
-
53
-
54
-
55
-
56
-
57
-
58
-
59
-
60
-
61
-
62
-
63
-
64
-
65
-
66
-
67
-
68
-
69
-
70
-
71
-
72
-
73
-
74
-
75
-
76
-
77
-
78
-
79
-
80
-
81
-
82
-
83
-
84
-
85
-
86
-
87
-
88
-
89
-
90
-
91
-
92
-
93
-
94
-
95
-
96
-
97
-
98
-
99
-
100
-
101
-
102
-
103
-
104
-
105
-
106
-
107
-
108
-
109
-
110
-
111
-
112
-
113
-
114
-
115
-
116
-
117
-
118
-
119
-
120
-
121
-
122
-
 123
123 -
 124
124 -
 125
125 -
 126
126 -
 127
127 -
 128
128 -
 129
129 -
 130
130 -
 131
131 -
 132
132 -
 133
133 -
134
-
135
-
136
-
137
-
138
-
139
-
140
-
141
-
142
-
143
-
144
-
145
-
146
-
147
-
148
-
149
-
150
-
151
-
152
-
153
-
154
 |
 |
