Kyocera FS-1050TN User Guide - Page 77
Separation, Offset Jobs
 |
View all Kyocera FS-1050TN manuals
Add to My Manuals
Save this manual to your list of manuals |
Page 77 highlights
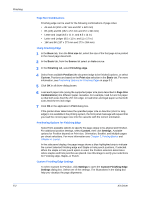
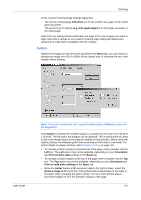
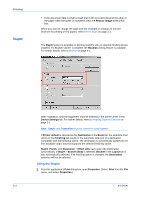
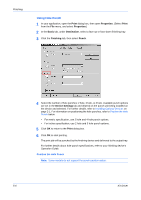
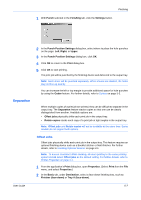
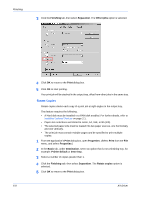
Finishing 1 With Punch selected in the Finishing tab, click the Settings button. 1 Separation 2 In the Punch Position Settings dialog box, select where to place the hole punches on the page: Left, Right, or Upper. 2 3 In the Punch Position Settings dialog box, click OK. 3 4 Click OK to return to the Print dialog box. 4 5 Click OK to start printing. 5 The print job will be punched by the finishing device and delivered to the output tray. Note: Each sheet will be punched separately. When sheets are stacked, the holes may not line up exactly. You can increase the left or top margin to provide additional space for hole punches by using the Gutter feature. For further details, refer to Gutters on page 5-3. When multiple copies of a print job are printed, they can be difficult to separate in the output tray. The Separation feature stacks copies so that one can be clearly distinguished from another. Available options are: • Offset jobs physically shifts each print job in the output tray. • Rotate copies stacks each copy of a print job at right angles in the output tray. Note: Offset jobs and Rotate copies will not be available at the same time. Some models do not support both options. Offset Jobs Offset jobs physically shifts each print job in the output tray. This feature requires an optional finishing device such as a Booklet stitcher or Multi finisher. For further details, refer to Installing Optional Devices on page 2-1. Note: To ensure consistent offset stacking, all users printing to the same printing system should select Offset jobs as the default setting. For further details, refer to Printer Properties on page 2-1. 1 From the application's Print dialog box, open Properties. (Select Print from the File menu, and select Properties.) 1 2 In the Basic tab, under Destination, select a face-down finishing tray, such as Finisher (face-down) or Tray A (face-down). 2 User Guide 5-7
-
 1
1 -
2
-
3
-
4
-
5
-
6
-
7
-
8
-
9
-
10
-
11
-
12
-
13
-
14
-
15
-
16
-
17
-
18
-
19
-
20
-
21
-
22
-
23
-
24
-
25
-
26
-
27
-
28
-
29
-
30
-
31
-
32
-
33
-
34
-
35
-
36
-
37
-
38
-
39
-
40
-
41
-
42
-
43
-
44
-
45
-
46
-
47
-
48
-
49
-
50
-
51
-
52
-
53
-
54
-
55
-
56
-
57
-
58
-
59
-
60
-
61
-
62
-
63
-
64
-
65
-
66
-
67
-
68
-
69
-
70
-
71
-
 72
72 -
 73
73 -
 74
74 -
 75
75 -
 76
76 -
 77
77 -
 78
78 -
 79
79 -
 80
80 -
 81
81 -
 82
82 -
83
-
84
-
85
-
86
-
87
-
88
-
89
-
90
-
91
-
92
-
93
-
94
-
95
-
96
-
97
-
98
-
99
-
100
-
101
-
102
-
103
-
104
-
105
-
106
-
107
-
108
-
109
-
110
-
111
-
112
-
113
-
114
-
115
-
116
-
117
-
118
-
119
-
120
-
121
-
122
-
123
-
124
-
125
-
126
-
127
-
128
-
129
-
130
-
131
-
132
-
133
-
134
-
135
-
136
-
137
-
138
-
139
-
140
-
141
-
142
-
143
-
144
-
145
-
146
-
147
-
148
-
149
-
150
-
151
-
152
-
153
-
154
 |
 |
