Kyocera FS-1050TN User Guide - Page 134
Add Security Watermark, Security watermark name, Line 1, None], User Defined, Cancel
 |
View all Kyocera FS-1050TN manuals
Add to My Manuals
Save this manual to your list of manuals |
Page 134 highlights
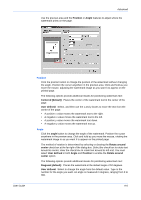
Advanced Add Security Watermark You can create your own custom security watermarks with different fonts, styles, colors, sizes and angles. You can also make changes to the footer, footer position, background pattern, pattern shading, and text contrast. A maximum of 26 security watermarks can be added (in addition to the existing standard security watermarks). Note: The Add button is unavailable when the number of security watermarks reaches the maximum of 30. You must delete items to make the Add button available again. 1 Click Add to open the Add Security Watermark dialog box. 1 2 Type a descriptive name for your watermark in the Security watermark name text box. The name can be different from the actual watermark text, but the name cannot be the same as one of the standard security watermark names. After the new watermark is added, its name appears in the Select security watermark drop-down list. 2 If you type the same name as a previously added security watermark, when you try to add the new watermark the driver will prompt you for a decision to replace the one that already exists. Click Yes to replace the existing security watermark with the new one, or click No to cancel the Add action. If you do not type a name, and the name text box is left blank, the driver will prompt you to type a name. A security watermark cannot be saved with a blank name. 3 Up to three lines of text can be printed as a security watermark. Though the text lines (Line 1, Line 2, Line 3) are all optional, at least one of the lines must contain text.3 To leave a text line blank, select [None] from that line's drop-down list. With User Defined selected from the Line text drop-down list, type the text you want in the text box next to the drop-down list. The maximum length of each line of text is 39 characters. As you type, your text will appear in the preview pane at the left. As an alternative to creating your own security watermark text, you can choose one of the following selections from the list. These options direct the printing system to retrieve information from the computer or printer driver to print the security watermark: • Computer name • Date and time • Job name • Mac address • User name • Date • Time • IP address • Job ID For date, time, and job selections, only a label for the selection will appear in the preview panel. When the job is printed, the actual date, time or job information will print as the security watermark text. 4 To add the new custom security watermark, click OK. To quit the dialog box without saving the watermark, click Cancel. 4 9-11 KX Driver
-
 1
1 -
2
-
3
-
4
-
5
-
6
-
7
-
8
-
9
-
10
-
11
-
12
-
13
-
14
-
15
-
16
-
17
-
18
-
19
-
20
-
21
-
22
-
23
-
24
-
25
-
26
-
27
-
28
-
29
-
30
-
31
-
32
-
33
-
34
-
35
-
36
-
37
-
38
-
39
-
40
-
41
-
42
-
43
-
44
-
45
-
46
-
47
-
48
-
49
-
50
-
51
-
52
-
53
-
54
-
55
-
56
-
57
-
58
-
59
-
60
-
61
-
62
-
63
-
64
-
65
-
66
-
67
-
68
-
69
-
70
-
71
-
72
-
73
-
74
-
75
-
76
-
77
-
78
-
79
-
80
-
81
-
82
-
83
-
84
-
85
-
86
-
87
-
88
-
89
-
90
-
91
-
92
-
93
-
94
-
95
-
96
-
97
-
98
-
99
-
100
-
101
-
102
-
103
-
104
-
105
-
106
-
107
-
108
-
109
-
110
-
111
-
112
-
113
-
114
-
115
-
116
-
117
-
118
-
119
-
120
-
121
-
122
-
123
-
124
-
125
-
126
-
127
-
128
-
 129
129 -
 130
130 -
 131
131 -
 132
132 -
 133
133 -
 134
134 -
 135
135 -
 136
136 -
 137
137 -
 138
138 -
 139
139 -
140
-
141
-
142
-
143
-
144
-
145
-
146
-
147
-
148
-
149
-
150
-
151
-
152
-
153
-
154
 |
 |
