Kyocera FS-1050TN User Guide - Page 125
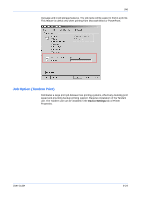
Select Prologue/Epilogue File to Insert, Add, Edit, Delete, Insertion Point, Unassigned
 |
View all Kyocera FS-1050TN manuals
Add to My Manuals
Save this manual to your list of manuals |
Page 125 highlights
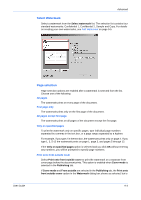
User Guide Advanced Select Prologue/Epilogue File to Insert From the list, select the name of a command file to insert into the print job. (If no file names are visible in the list, you must click Add to browse for files on your computer or network to add to the list.) Selecting a file enables the insertion point options for that file in the dialog box. Add Click Add to browse your computer or network for command files. The files are plain text format and typically have a file name extension of either .txt or .log. Edit Select a file name in the list, then click Edit. Microsoft Notepad opens for editing the file text. To return to the Prologue/Epilogue dialog box, save any changes to the file and exit Notepad. Note: Editing a file changes the original file in the computer or network directory. Delete Select a Prologue/Epilogue file name, then click Delete. In the message box, click Yes to confirm the deletion. To refuse the deletion, click No. Note: The file name only is removed from the Prologue/Epilogue list. The original file itself is not deleted; it remains in the computer or network directory. Insertion Point Each file in the list can be assigned only one insertion point. Choose one of the following insertion point options: Unassigned The selected command file is not inserted into the print job. This is useful if the list contains several command files, and you want to print some but not others. Select Unassigned for the files you do not want to print. Note: To disable all command files (thereby disabling the entire Prologue/Epilogue feature), select [None] at the top of the file list. Beginning of the print job The command file is inserted as the first page of the print job. The document starts printing on the second page. End of the print job The command file is inserted as the last page of the print job, which prints after the last page of the document. Note: The following Start of the page and End of the page insertion point options are available only when PCL 5e or PCL 5c is selected as the PDL (Page Description 9-2
-
 1
1 -
2
-
3
-
4
-
5
-
6
-
7
-
8
-
9
-
10
-
11
-
12
-
13
-
14
-
15
-
16
-
17
-
18
-
19
-
20
-
21
-
22
-
23
-
24
-
25
-
26
-
27
-
28
-
29
-
30
-
31
-
32
-
33
-
34
-
35
-
36
-
37
-
38
-
39
-
40
-
41
-
42
-
43
-
44
-
45
-
46
-
47
-
48
-
49
-
50
-
51
-
52
-
53
-
54
-
55
-
56
-
57
-
58
-
59
-
60
-
61
-
62
-
63
-
64
-
65
-
66
-
67
-
68
-
69
-
70
-
71
-
72
-
73
-
74
-
75
-
76
-
77
-
78
-
79
-
80
-
81
-
82
-
83
-
84
-
85
-
86
-
87
-
88
-
89
-
90
-
91
-
92
-
93
-
94
-
95
-
96
-
97
-
98
-
99
-
100
-
101
-
102
-
103
-
104
-
105
-
106
-
107
-
108
-
109
-
110
-
111
-
112
-
113
-
114
-
115
-
116
-
117
-
118
-
119
-
 120
120 -
 121
121 -
 122
122 -
 123
123 -
 124
124 -
 125
125 -
 126
126 -
 127
127 -
 128
128 -
 129
129 -
 130
130 -
131
-
132
-
133
-
134
-
135
-
136
-
137
-
138
-
139
-
140
-
141
-
142
-
143
-
144
-
145
-
146
-
147
-
148
-
149
-
150
-
151
-
152
-
153
-
154
 |
 |
