Kyocera KM-2030 2030 Instruction Handbook Rev 2C - Page 11
Front cover, Main switch - cartridge
 |
View all Kyocera KM-2030 manuals
Add to My Manuals
Save this manual to your list of manuals |
Page 11 highlights
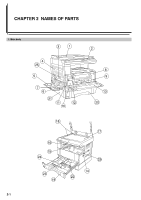
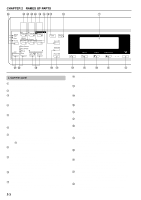
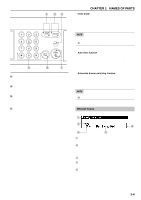
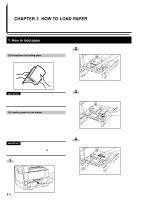
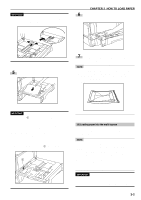
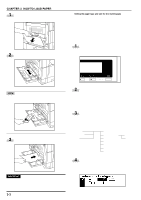
1 Original cover (Open/close to set the original on the platen.) 2 Operation panel (Contains the keys and indicators for operating the copier.) 3 Left cover handle (Hold to open the left cover.) 4 Left cover (Open when a paper misfeed occurs.) 5 Multi-Bypass (Load paper here when copying onto small-size or special paper.) 6 Insert guides (Be sure to set the paper width when loading paper on the multi-bypass.) 7 Support tray (Operate to use large-size paper.) 8 Toner cartridge 9 Toner cartridge release lever (Operate to replace the toner cartridge.) 0 Waste toner tank ! Waste toner tank release lever (Operate to replace the waste toner tank.) @ Cleaning shaft (Pull and push back in after toner cartridge replacement or when copy images become soiled with toner.) # Front cover (Open to replace the toner cartridge or waste toner tank.) $ Main switch (Turn ON (|) before starting to make copies.) % Copy store section (Copied paper is stored here.) ^ Ejection section & Platen (Set originals here for copying. Place originals face-down with the edges aligned with the size scales on the left and rear sides of the platen.) * Original size scales (Be sure to align the original with these when setting the original on the platen.) ( Drawer 1 (Holds up to 250 sheets of standard paper [standard paper specified by our company].) ) Drawer 2 (Holds up to 250 sheets of standard paper [standard paper specified by our company].) ⁄ Drawer left cover (Open when a paper misfeed occurs inside the drawer left cover.) ¤ Length adjustment plate (Adjust to the length of the paper to be set in the drawer.) ‹ Width adjustment lever (Hold the lever and adjust the width guide to the width of the paper to be set in the drawer.) › Drawer bottom plate (Push down when loading paper.) CHAPTER 2 NAMES OF PARTS fi Handles for transport (The right two handles are indented handles. The left two become handles when pulled out.) 2-2
-
 1
1 -
2
-
3
-
4
-
5
-
 6
6 -
 7
7 -
 8
8 -
 9
9 -
 10
10 -
 11
11 -
 12
12 -
 13
13 -
 14
14 -
 15
15 -
 16
16 -
17
-
18
-
19
-
20
-
21
-
22
-
23
-
24
-
25
-
26
-
27
-
28
-
29
-
30
-
31
-
32
-
33
-
34
-
35
-
36
-
37
-
38
-
39
-
40
-
41
-
42
-
43
-
44
-
45
-
46
-
47
-
48
-
49
-
50
-
51
-
52
-
53
-
54
-
55
-
56
-
57
-
58
-
59
-
60
-
61
-
62
-
63
-
64
-
65
-
66
-
67
-
68
-
69
-
70
-
71
-
72
-
73
-
74
-
75
 |
 |