Lenovo ThinkCentre M70z Hardware Maintenance Manual (HMM) - Page 79
Slide the new hard disk drive with the bracket into the hard disk drive bay.
 |
View all Lenovo ThinkCentre M70z manuals
Add to My Manuals
Save this manual to your list of manuals |
Page 79 highlights
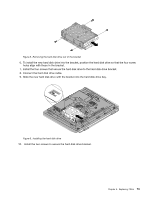
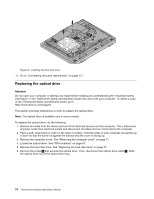
Figure 8. Removing the hard disk drive out of the bracket 6. To install the new hard disk drive into the bracket, position the hard disk drive so that the four screw holes align with those in the bracket. 7. Install the four screws that secure the hard disk drive to the hard disk drive bracket. 8. Connect the hard disk drive cable. 9. Slide the new hard disk drive with the bracket into the hard disk drive bay. Figure 9. Installing the hard disk drive 10. Install the two screws to secure the hard disk drive bracket. Chapter 8. Replacing FRUs 73
-
 1
1 -
2
-
3
-
4
-
5
-
6
-
7
-
8
-
9
-
10
-
11
-
12
-
13
-
14
-
15
-
16
-
17
-
18
-
19
-
20
-
21
-
22
-
23
-
24
-
25
-
26
-
27
-
28
-
29
-
30
-
31
-
32
-
33
-
34
-
35
-
36
-
37
-
38
-
39
-
40
-
41
-
42
-
43
-
44
-
45
-
46
-
47
-
48
-
49
-
50
-
51
-
52
-
53
-
54
-
55
-
56
-
57
-
58
-
59
-
60
-
61
-
62
-
63
-
64
-
65
-
66
-
67
-
68
-
69
-
70
-
71
-
72
-
73
-
 74
74 -
 75
75 -
 76
76 -
 77
77 -
 78
78 -
 79
79 -
 80
80 -
 81
81 -
 82
82 -
 83
83 -
 84
84 -
85
-
86
-
87
-
88
-
89
-
90
-
91
-
92
-
93
-
94
-
95
-
96
-
97
-
98
-
99
-
100
-
101
-
102
-
103
-
104
-
105
-
106
-
107
-
108
-
109
-
110
-
111
-
112
-
113
-
114
-
115
-
116
-
117
-
118
-
119
-
120
-
121
-
122
-
123
-
124
-
125
-
126
-
127
-
128
-
129
-
130
-
131
-
132
-
133
-
134
-
135
-
136
-
137
-
138
-
139
-
140
-
141
-
142
-
143
-
144
-
145
-
146
-
147
-
148
-
149
-
150
-
151
-
152
-
153
-
154
-
155
-
156
-
157
-
158
-
159
-
160
-
161
-
162
-
163
-
164
-
165
-
166
-
167
-
168
-
169
-
170
-
171
-
172
-
173
-
174
-
175
-
176
-
177
-
178
-
179
-
180
-
181
-
182
-
183
-
184
-
185
-
186
-
187
-
188
-
189
-
190
-
191
-
192
-
193
-
194
-
195
-
196
-
197
-
198
-
199
-
200
-
201
-
202
-
203
-
204
-
205
-
206
-
207
-
208
 |
 |

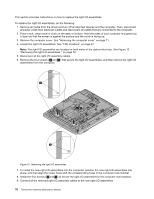
Figure 8. Removing the hard disk drive out of the bracket
6. To install the new hard disk drive into the bracket, position the hard disk drive so that the four screw
holes align with those in the bracket.
7. Install the four screws that secure the hard disk drive to the hard disk drive bracket.
8. Connect the hard disk drive cable.
9. Slide the new hard disk drive with the bracket into the hard disk drive bay.
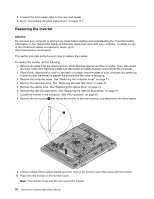
Figure 9. Installing the hard disk drive
10.
Install the two screws to secure the hard disk drive bracket.
Chapter 8
.
Replacing FRUs
73