Lexmark X5070 User's Guide (Mac) - Page 105
Using the Printer Selection dialog, Using the Setup dialog, Available printers, Use Shared
 |
View all Lexmark X5070 manuals
Add to My Manuals
Save this manual to your list of manuals |
Page 105 highlights
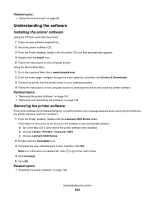
Using the Printer Selection dialog The Printer Selection dialog appears in Lexmark Setup Assistant during installation. It lists all available shared and remote printers connected to your computer. It also lets you select a printer you want to use. To do this: 1 From the first pop-up menu, choose Available printers, Use Shared (for shared printers) or Add Remote. 2 Under the Printer Name window, choose your printer. 3 Click Continue. Related topics: • "Installing the printer software" on page 104 Using the Printer Setup Complete dialog The Printer Setup Complete dialog provides helpful options after successful installation. From here you can: • Check for special offers. • Print a test page. Related topics: • "Installing the printer software" on page 104 Using the Page Setup dialog You can open the Page Setup dialog from almost any application: 1 With a document or photo open, choose File Œ Page Setup. The Page Setup dialog appears. 2 Adjust the settings. From here Settings Choose Page Attributes Save as Default To Choose a paper size, orientation, or scaling value for a photo. Save customized settings as the default settings. Understanding the printer 105
-
 1
1 -
2
-
3
-
4
-
5
-
6
-
7
-
8
-
9
-
10
-
11
-
12
-
13
-
14
-
15
-
16
-
17
-
18
-
19
-
20
-
21
-
22
-
23
-
24
-
25
-
26
-
27
-
28
-
29
-
30
-
31
-
32
-
33
-
34
-
35
-
36
-
37
-
38
-
39
-
40
-
41
-
42
-
43
-
44
-
45
-
46
-
47
-
48
-
49
-
50
-
51
-
52
-
53
-
54
-
55
-
56
-
57
-
58
-
59
-
60
-
61
-
62
-
63
-
64
-
65
-
66
-
67
-
68
-
69
-
70
-
71
-
72
-
73
-
74
-
75
-
76
-
77
-
78
-
79
-
80
-
81
-
82
-
83
-
84
-
85
-
86
-
87
-
88
-
89
-
90
-
91
-
92
-
93
-
94
-
95
-
96
-
97
-
98
-
99
-
 100
100 -
 101
101 -
 102
102 -
 103
103 -
 104
104 -
 105
105 -
 106
106 -
 107
107 -
 108
108 -
 109
109 -
 110
110 -
111
-
112
-
113
-
114
-
115
-
116
-
117
-
118
-
119
-
120
-
121
-
122
-
123
-
124
-
125
-
126
-
127
-
128
-
129
-
130
-
131
-
132
-
133
-
134
-
135
-
136
-
137
-
138
-
139
-
140
-
141
-
142
-
143
-
144
-
145
-
146
-
147
-
148
-
149
-
150
-
151
-
152
-
153
-
154
-
155
-
156
-
157
-
158
-
159
-
160
-
161
-
162
-
163
-
164
-
165
-
166
-
167
-
168
-
169
-
170
-
171
-
172
-
173
-
174
-
175
-
176
-
177
-
178
-
179
-
180
-
181
-
182
-
183
-
184
-
185
-
186
 |
 |