Lexmark X5070 User's Guide (Mac) - Page 99
Understanding the PictBridge menu, Start Color, Start Black
 |
View all Lexmark X5070 manuals
Add to My Manuals
Save this manual to your list of manuals |
Page 99 highlights
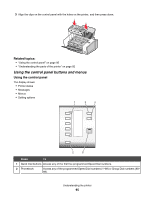
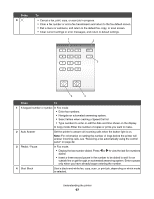
6 Press or repeatedly until the submenu item or the setting you want appears, and then press . Note: Pressing selects a setting. An * appears next to the selected setting. 7 To go into additional submenus and settings, repeat pressing or repeatedly until the submenu item or the setting you want appears, and then press . 8 If needed, press repeatedly to return to the previous menus and make other setting selections. 9 Press Start Color or Start Black. Use this To Quality* Adjust the quality of a scan. Original Size* Specify the size of the original document. * Temporary setting. For information on saving temporary and other settings, see the related topic, "Customizing Settings." Related topics: • "Using the control panel" on page 95 • "Saving settings" on page 103 Understanding the PictBridge menu The PictBridge default settings menu lets you select printer settings if you did not specify the settings beforehand on your digital camera. For more information on making camera selections, see the documentation that came with your camera. 1 Connect a PictBridge-enabled digital camera to the printer. a Insert one end of the USB cable into the camera. Note: Use only the USB cable that came with the digital camera. b Insert the other end of the cable into the PictBridge port on the front of the printer. Note: The PictBridge port is marked with the PictBridge symbol. Understanding the printer 99
-
 1
1 -
2
-
3
-
4
-
5
-
6
-
7
-
8
-
9
-
10
-
11
-
12
-
13
-
14
-
15
-
16
-
17
-
18
-
19
-
20
-
21
-
22
-
23
-
24
-
25
-
26
-
27
-
28
-
29
-
30
-
31
-
32
-
33
-
34
-
35
-
36
-
37
-
38
-
39
-
40
-
41
-
42
-
43
-
44
-
45
-
46
-
47
-
48
-
49
-
50
-
51
-
52
-
53
-
54
-
55
-
56
-
57
-
58
-
59
-
60
-
61
-
62
-
63
-
64
-
65
-
66
-
67
-
68
-
69
-
70
-
71
-
72
-
73
-
74
-
75
-
76
-
77
-
78
-
79
-
80
-
81
-
82
-
83
-
84
-
85
-
86
-
87
-
88
-
89
-
90
-
91
-
92
-
93
-
 94
94 -
 95
95 -
 96
96 -
 97
97 -
 98
98 -
 99
99 -
 100
100 -
 101
101 -
 102
102 -
 103
103 -
 104
104 -
105
-
106
-
107
-
108
-
109
-
110
-
111
-
112
-
113
-
114
-
115
-
116
-
117
-
118
-
119
-
120
-
121
-
122
-
123
-
124
-
125
-
126
-
127
-
128
-
129
-
130
-
131
-
132
-
133
-
134
-
135
-
136
-
137
-
138
-
139
-
140
-
141
-
142
-
143
-
144
-
145
-
146
-
147
-
148
-
149
-
150
-
151
-
152
-
153
-
154
-
155
-
156
-
157
-
158
-
159
-
160
-
161
-
162
-
163
-
164
-
165
-
166
-
167
-
168
-
169
-
170
-
171
-
172
-
173
-
174
-
175
-
176
-
177
-
178
-
179
-
180
-
181
-
182
-
183
-
184
-
185
-
186
 |
 |
