Lexmark X5070 User's Guide (Mac) - Page 109
From here, Choose, Click, Save as PDF in Mac OS X version - review
 |
View all Lexmark X5070 manuals
Add to My Manuals
Save this manual to your list of manuals |
Page 109 highlights
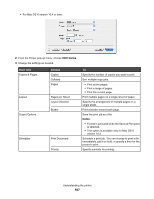
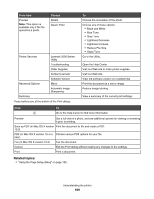
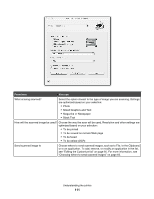
From here Preview Note: This option is available only if the file opened is a photo. Choose Rotate Quartz Filter Printer Services Lexmark 5000 Series Utility Troubleshooting Order Supplies Contact Lexmark Software Version Advanced Options Mirror Automatic Image Sharpening Summary These buttons are at the bottom of the Print dialog: To Choose the orientation of the photo. Choose any of these options: • Black and White • Blue Tone • Gray Tone • Lightness Decrease • Lightness Increase • Reduce File Size • Sepia Tone Go to the Utility. Open the Help Center. Visit our Web site to order printer supplies. Visit our Web site. View the software version on installed files. Print the document as a mirror image. Reduce image blurring. View a summary of the current print settings. Click To Go to the Help Center to find more information. Preview Get a full view of a photo, and see additional options for viewing or reviewing it prior to printing. Save as PDF (in Mac OS X version Print the document to file and create a PDF. 10.3) PDF (in Mac OS X version 10.4 or Choose various PDF options for your file. later) Fax (in Mac OS X version 10.3) Fax the document. Cancel Exit the Print dialog without making any changes to the settings. Print Print a document. Related topics: • "Using the Page Setup dialog" on page 105 Understanding the printer 109
-
 1
1 -
2
-
3
-
4
-
5
-
6
-
7
-
8
-
9
-
10
-
11
-
12
-
13
-
14
-
15
-
16
-
17
-
18
-
19
-
20
-
21
-
22
-
23
-
24
-
25
-
26
-
27
-
28
-
29
-
30
-
31
-
32
-
33
-
34
-
35
-
36
-
37
-
38
-
39
-
40
-
41
-
42
-
43
-
44
-
45
-
46
-
47
-
48
-
49
-
50
-
51
-
52
-
53
-
54
-
55
-
56
-
57
-
58
-
59
-
60
-
61
-
62
-
63
-
64
-
65
-
66
-
67
-
68
-
69
-
70
-
71
-
72
-
73
-
74
-
75
-
76
-
77
-
78
-
79
-
80
-
81
-
82
-
83
-
84
-
85
-
86
-
87
-
88
-
89
-
90
-
91
-
92
-
93
-
94
-
95
-
96
-
97
-
98
-
99
-
100
-
101
-
102
-
103
-
 104
104 -
 105
105 -
 106
106 -
 107
107 -
 108
108 -
 109
109 -
 110
110 -
 111
111 -
 112
112 -
 113
113 -
 114
114 -
115
-
116
-
117
-
118
-
119
-
120
-
121
-
122
-
123
-
124
-
125
-
126
-
127
-
128
-
129
-
130
-
131
-
132
-
133
-
134
-
135
-
136
-
137
-
138
-
139
-
140
-
141
-
142
-
143
-
144
-
145
-
146
-
147
-
148
-
149
-
150
-
151
-
152
-
153
-
154
-
155
-
156
-
157
-
158
-
159
-
160
-
161
-
162
-
163
-
164
-
165
-
166
-
167
-
168
-
169
-
170
-
171
-
172
-
173
-
174
-
175
-
176
-
177
-
178
-
179
-
180
-
181
-
182
-
183
-
184
-
185
-
186
 |
 |
