Netgear DG834G DG834Gv5 Reference Manual - Page 165
ProSafe, Security Policy Editor, Connection, toDG834G
 |
UPC - 606449029918
View all Netgear DG834G manuals
Add to My Manuals
Save this manual to your list of manuals |
Page 165 highlights
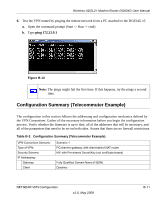
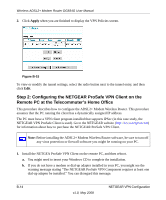
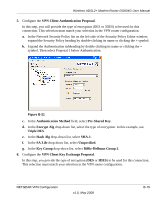
Wireless ADSL2+ Modem Router DG834G User Manual c. Install the IPSec component. You might have the option to install either the VPN adapter or the IPSec component or both. The VPN adapter is not necessary. d. The system should show the ProSafe icon ( ) in the system tray after rebooting. e. Double-click the system tray icon to open the Security Policy Editor. 2. Add a new connection. a. Run the NETGEAR ProSafe Security Policy Editor program, and create a VPN Connection. b. From the Edit menu of the Security Policy Editor, click Add, and then click Connection. A New Connection listing appears in the list of policies. Rename the new connection so that it matches the connection name that you entered in the VPN settings of the DG834G v5 on Gateway A. Note: In this example, the connection name used on the client side of the VPN tunnel is toDG834G and it does not have to match the VPN_client connection name used on the gateway side of the VPN tunnel (see Figure B-17) because connection names are irrelevant to how the VPN tunnel functions. Tip: Choose connection names that make sense to the people using and administrating the VPN. Figure B-16 NETGEAR VPN Configuration v1.0, May 2008 B-15
-
 1
1 -
2
-
3
-
4
-
5
-
6
-
7
-
8
-
9
-
10
-
11
-
12
-
13
-
14
-
15
-
16
-
17
-
18
-
19
-
20
-
21
-
22
-
23
-
24
-
25
-
26
-
27
-
28
-
29
-
30
-
31
-
32
-
33
-
34
-
35
-
36
-
37
-
38
-
39
-
40
-
41
-
42
-
43
-
44
-
45
-
46
-
47
-
48
-
49
-
50
-
51
-
52
-
53
-
54
-
55
-
56
-
57
-
58
-
59
-
60
-
61
-
62
-
63
-
64
-
65
-
66
-
67
-
68
-
69
-
70
-
71
-
72
-
73
-
74
-
75
-
76
-
77
-
78
-
79
-
80
-
81
-
82
-
83
-
84
-
85
-
86
-
87
-
88
-
89
-
90
-
91
-
92
-
93
-
94
-
95
-
96
-
97
-
98
-
99
-
100
-
101
-
102
-
103
-
104
-
105
-
106
-
107
-
108
-
109
-
110
-
111
-
112
-
113
-
114
-
115
-
116
-
117
-
118
-
119
-
120
-
121
-
122
-
123
-
124
-
125
-
126
-
127
-
128
-
129
-
130
-
131
-
132
-
133
-
134
-
135
-
136
-
137
-
138
-
139
-
140
-
141
-
142
-
143
-
144
-
145
-
146
-
147
-
148
-
149
-
150
-
151
-
152
-
153
-
154
-
155
-
156
-
157
-
158
-
159
-
 160
160 -
 161
161 -
 162
162 -
 163
163 -
 164
164 -
 165
165 -
 166
166 -
 167
167 -
 168
168 -
 169
169 -
 170
170 -
171
-
172
-
173
-
174
-
175
-
176
 |
 |