Netgear DG834G DG834Gv5 Reference Manual - Page 39
Using a WPS Button to Add a WPS Client, Entering a PIN, admin, password, Push Button recommended - smart wizard
 |
UPC - 606449029918
View all Netgear DG834G manuals
Add to My Manuals
Save this manual to your list of manuals |
Page 39 highlights
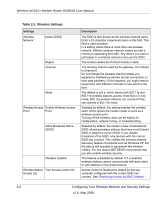
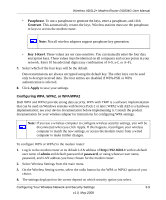
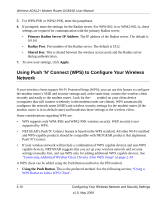
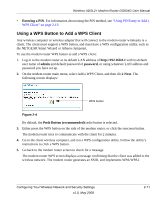
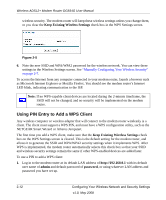
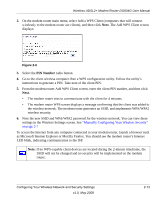
Wireless ADSL2+ Modem Router DG834G User Manual • Entering a PIN. For information about using the PIN method, see "Using PIN Entry to Add a WPS Client" on page 2-13. Using a WPS Button to Add a WPS Client Any wireless computer or wireless adapter that will connect to the modem router wirelessly is a client. The client must support a WPS button, and must have a WPS configuration utility, such as the NETGEAR Smart Wizard or Atheros Jumpstart. To use the modem router WPS button to add a WPS client: 1. Log in to the modem router at its default LAN address of http://192.168.0.1 with its default user name of admin and default password of password, or using whatever LAN address and password you have set up. 2. On the modem router main menu, select Add a WPS Client, and then click Next. The following screen displays: WPS button Figure 2-4 By default, the Push Button (recommended) radio button is selected. 3. Either press the WPS button on the side of the modem router, or click the onscreen button. The modem router tries to communicate with the client for 2 minutes. 4. Go to the client wireless computer, and run a WPS configuration utility. Follow the utility's instructions to click a WPS button. 5. Go back to the modem router screen to check for a message. The modem router WPS screen displays a message confirming that the client was added to the wireless network. The modem router generates an SSID, and implements WPA/WPA2 Configuring Your Wireless Network and Security Settings v1.0, May 2008 2-11
-
 1
1 -
2
-
3
-
4
-
5
-
6
-
7
-
8
-
9
-
10
-
11
-
12
-
13
-
14
-
15
-
16
-
17
-
18
-
19
-
20
-
21
-
22
-
23
-
24
-
25
-
26
-
27
-
28
-
29
-
30
-
31
-
32
-
33
-
 34
34 -
 35
35 -
 36
36 -
 37
37 -
 38
38 -
 39
39 -
 40
40 -
 41
41 -
 42
42 -
 43
43 -
 44
44 -
45
-
46
-
47
-
48
-
49
-
50
-
51
-
52
-
53
-
54
-
55
-
56
-
57
-
58
-
59
-
60
-
61
-
62
-
63
-
64
-
65
-
66
-
67
-
68
-
69
-
70
-
71
-
72
-
73
-
74
-
75
-
76
-
77
-
78
-
79
-
80
-
81
-
82
-
83
-
84
-
85
-
86
-
87
-
88
-
89
-
90
-
91
-
92
-
93
-
94
-
95
-
96
-
97
-
98
-
99
-
100
-
101
-
102
-
103
-
104
-
105
-
106
-
107
-
108
-
109
-
110
-
111
-
112
-
113
-
114
-
115
-
116
-
117
-
118
-
119
-
120
-
121
-
122
-
123
-
124
-
125
-
126
-
127
-
128
-
129
-
130
-
131
-
132
-
133
-
134
-
135
-
136
-
137
-
138
-
139
-
140
-
141
-
142
-
143
-
144
-
145
-
146
-
147
-
148
-
149
-
150
-
151
-
152
-
153
-
154
-
155
-
156
-
157
-
158
-
159
-
160
-
161
-
162
-
163
-
164
-
165
-
166
-
167
-
168
-
169
-
170
-
171
-
172
-
173
-
174
-
175
-
176
 |
 |