Panasonic AJHPX2700G AJHPX2700G User Guide - Page 15
Parts and their Functions, Power Supply and Accessory Mounting
 |
View all Panasonic AJHPX2700G manuals
Add to My Manuals
Save this manual to your list of manuals |
Page 15 highlights
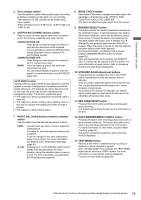
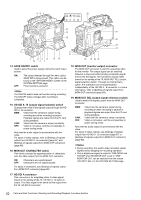
Parts and their Functions Parts and their Functions Power Supply and Accessory Mounting Section 16 11 576 6 2 9 8 1 1. POWER switch Used to turn on/off the power. 4 3 15 2. Battery mount A battery pack from Anton/Bauer is mounted here. 3. DC IN (external power input) socket (XLR, 4P) The unit is connected to an external DC power supply. 4. BREAKER switch When an excessive amount of current is fed through the unit, due to any abnormal event, the breaker automatically turns off the power in order to protect the device. After the interior of the unit has been checked and/or repaired, this button must be depressed. If there is no unusual reaction, the unit can be powered-up. 5. GPS connector This connects the optional GPS unit AJ-GPS910G. 6. Shoulder strap fittings The shoulder strap is attached here. 7. Light shoe A video light or similar accessory can be attached here. 8. Lens mount (bayonet 2/3-type) The lens is attached here. 9. Lens lever Lower this lever to lock the lens to the lens mount. 10 14 12 13 10. Lens mount cap To remove the cap, raise the 9. Lens lever. When the lens is not mounted, replace the cap. 11. Light cable clamp Secures the light cable. 12. Lens cable/microphone cable clamp This clamp secures the lens and microphone cables. 13. Tripod mount When you want to mount unit on a tripod, the optional tripod adapter (SHAN-TM700) is attached here. 14. LENS jack (12-pin) The lens connection cord is connected here. For a detailed description of your lens, see the relevant manufacturer's instruction manual. 15. DC OUT (DC power supply output) socket This output socket is designed for 12 V DC. It provides a maximum current of 1.5 A. Connect an external switch to this socket to control recording starts and stops or an LED for use as a tally lamp. For more information, see [Connection of the external switch] (page 119). 16. Accessory mounting holes (handle) Use these holes to mount accessories. These holes should not be used for any other purpose. 15 Parts and their Functions: Power Supply and Accessory Mounting Section
-
 1
1 -
2
-
3
-
4
-
5
-
6
-
7
-
8
-
9
-
 10
10 -
 11
11 -
 12
12 -
 13
13 -
 14
14 -
 15
15 -
 16
16 -
 17
17 -
 18
18 -
 19
19 -
 20
20 -
21
-
22
-
23
-
24
-
25
-
26
-
27
-
28
-
29
-
30
-
31
-
32
-
33
-
34
-
35
-
36
-
37
-
38
-
39
-
40
-
41
-
42
-
43
-
44
-
45
-
46
-
47
-
48
-
49
-
50
-
51
-
52
-
53
-
54
-
55
-
56
-
57
-
58
-
59
-
60
-
61
-
62
-
63
-
64
-
65
-
66
-
67
-
68
-
69
-
70
-
71
-
72
-
73
-
74
-
75
-
76
-
77
-
78
-
79
-
80
-
81
-
82
-
83
-
84
-
85
-
86
-
87
-
88
-
89
-
90
-
91
-
92
-
93
-
94
-
95
-
96
-
97
-
98
-
99
-
100
-
101
-
102
-
103
-
104
-
105
-
106
-
107
-
108
-
109
-
110
-
111
-
112
-
113
-
114
-
115
-
116
-
117
-
118
-
119
-
120
-
121
-
122
-
123
-
124
-
125
-
126
-
127
-
128
-
129
-
130
-
131
-
132
-
133
-
134
-
135
-
136
-
137
-
138
-
139
-
140
-
141
-
142
-
143
-
144
-
145
-
146
-
147
-
148
-
149
-
150
-
151
-
152
-
153
-
154
-
155
-
156
-
157
-
158
-
159
-
160
-
161
-
162
-
163
-
164
-
165
-
166
-
167
-
168
-
169
-
170
-
171
-
172
-
173
-
174
-
175
-
176
-
177
-
178
-
179
-
180
-
181
-
182
-
183
-
184
-
185
-
186
-
187
-
188
-
189
-
190
-
191
-
192
-
193
-
194
-
195
-
196
-
197
-
198
-
199
-
200
-
201
-
202
-
203
-
204
-
205
-
206
 |
 |
