Panasonic AJHPX2700G AJHPX2700G User Guide - Page 30
Recording and Playback, P2 Cards
 |
View all Panasonic AJHPX2700G manuals
Add to My Manuals
Save this manual to your list of manuals |
Page 30 highlights
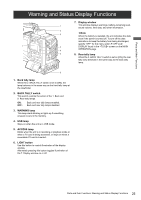
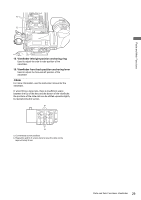
Recording and Playback Inserting P2 Cards P2 Cards 3 Insert a P2 card into the P2 card slot until the eject button pops up. Note When using the unit for the first time, be sure to set the time data beforehand. On how the time data is set, see [Setting Time Data] (page 60). 1 Turn on the POWER switch. d e a a. POWER: [ON] 2 While pressing down the slide lock button, slide the slide-out door to the left. The door opens. d. Eject button e. The card must be inserted with the logo right way up. 4 Tilt up the popped-up eject button. f c b. Slide lock button c. Slide-out door b f. P2 card access LED 5 The P2 card access LED indicates the status of P2 card in the slot. For how the P2 card status is indicated, see [P2 card access LED and status of P2 cards] (page 31). 6 Close the slide-out door. Note Do not leave the slide-out door open when moving unit. 30 Recording and Playback: P2 Cards
-
 1
1 -
2
-
3
-
4
-
5
-
6
-
7
-
8
-
9
-
10
-
11
-
12
-
13
-
14
-
15
-
16
-
17
-
18
-
19
-
20
-
21
-
22
-
23
-
24
-
 25
25 -
 26
26 -
 27
27 -
 28
28 -
 29
29 -
 30
30 -
 31
31 -
 32
32 -
 33
33 -
 34
34 -
 35
35 -
36
-
37
-
38
-
39
-
40
-
41
-
42
-
43
-
44
-
45
-
46
-
47
-
48
-
49
-
50
-
51
-
52
-
53
-
54
-
55
-
56
-
57
-
58
-
59
-
60
-
61
-
62
-
63
-
64
-
65
-
66
-
67
-
68
-
69
-
70
-
71
-
72
-
73
-
74
-
75
-
76
-
77
-
78
-
79
-
80
-
81
-
82
-
83
-
84
-
85
-
86
-
87
-
88
-
89
-
90
-
91
-
92
-
93
-
94
-
95
-
96
-
97
-
98
-
99
-
100
-
101
-
102
-
103
-
104
-
105
-
106
-
107
-
108
-
109
-
110
-
111
-
112
-
113
-
114
-
115
-
116
-
117
-
118
-
119
-
120
-
121
-
122
-
123
-
124
-
125
-
126
-
127
-
128
-
129
-
130
-
131
-
132
-
133
-
134
-
135
-
136
-
137
-
138
-
139
-
140
-
141
-
142
-
143
-
144
-
145
-
146
-
147
-
148
-
149
-
150
-
151
-
152
-
153
-
154
-
155
-
156
-
157
-
158
-
159
-
160
-
161
-
162
-
163
-
164
-
165
-
166
-
167
-
168
-
169
-
170
-
171
-
172
-
173
-
174
-
175
-
176
-
177
-
178
-
179
-
180
-
181
-
182
-
183
-
184
-
185
-
186
-
187
-
188
-
189
-
190
-
191
-
192
-
193
-
194
-
195
-
196
-
197
-
198
-
199
-
200
-
201
-
202
-
203
-
204
-
205
-
206
 |
 |
