Panasonic AJHPX2700G AJHPX2700G User Guide - Page 31
Recording and Playback, Removing P2 Cards, To Prevent Accidental Erasure of P2 Card, Content, Notes
 |
View all Panasonic AJHPX2700G manuals
Add to My Manuals
Save this manual to your list of manuals |
Page 31 highlights
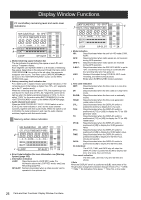
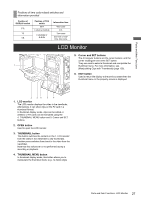
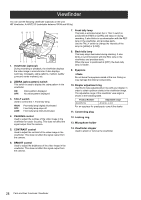
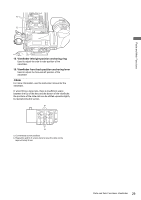
Recording and Playback Removing P2 Cards 1 While pressing down the slide lock button, move the slide-out door to the left. The door opens. 2 Tilt down the eject button. 3 Then, depress the eject button to release the P2 card so that you can remove it. The P2 card access LEDs may be set to stay off using the menu option ACCESS LED. This option can be found on the screen on the SYSTEM SETTING page. To Prevent Accidental Erasure of P2 Card Content To prevent the content of a P2 card being accidentally erased, position the write-protect switch on the P2 card at [Protect]. Note Write-protect switchover can be performed while the card is being accessed (during recording or playback), but does not take effect until access to the card ceases. 1 Tilt down the eject button. 2 Depress the tilted-down eject button to release the P2 card. Notes Do not remove the P2 card while it is being accessed or recognized (the P2 card access LED flashes orange), or the P2 card may fail. When the unit is set to keep the P2 card access LEDs turned off, stop the recording/playback and ensure that the PRE RECORDING is complete before removing the P2 card. If a P2 card being accessed is removed, the viewfinder displays "TURN POWER OFF" and unit gives a warning using an alarm and the WARNING lamp. In addition, all P2 card access LEDs blink rapidly in orange. If this is the case, turn the power off. For more information on warning indications, see [Warning System] (page 155). If a P2 card is removed while being accessed, clips on it may become irregular. Check the clips and restore them if required. For more information about how to restore clips, see [Restoring Clips] (page 129). If a P2 card being formatted is removed, it may be not be formatted properly. In this case, the viewfinder displays "TURN POWER OFF". If this message appears, turn off the power, then restart unit to reformat the card. If a P2 card is inserted while another P2 card is being played back, the inserted P2 card is not recognized and the P2 card access LED for that card does not come on. Card recognition starts when the playback ends. Even if a P2 card is inserted in a vacant slot while recording, the media may not be recognized during the following times: - Immediately after pre-recording - Immediately before or after switching from the first P2 card for recording to the second one, when data are recorded on multiple cards spanning from one to the other (hot-swap recording) a Protect a. Write-protect switch P2 card access LED and status of P2 cards P2 card access MODE CHECK LED indication* Status of P2 Card Stays on in green ACTIVE Writing and reading enabled. Stays on in orange ACTIVE Writing and reading enabled. The card is the current target card for recording (including LOOP REC). Blinks in orange ACCESSING Writing or reading being performed. Blinks rapidly in INFO READING Recognizing the P2 card. orange Blinks slowly in FULL green The P2 card has no free space. Only reading is enabled. PROTECTED The write-protect switch on the P2 card is positioned at [Protect]. Only reading is enabled. Stays off NOT SUPPORTED The card is not supported by your unit. Replace the card. FORMAT ERROR The P2 card is not properly formatted. Reformat the card. NO CARD No P2 card is inserted. * The mode check indication is shown in the viewfinder. For more information, see [Viewfinder Status Indication Layout] (page 75). The access LED located on the display window blinks when reading or writing data from or to any of the P2 cards inserted in slots 1 - 5 or stays illuminated when any of the cards are recordable. It stays off when none of the P2 cards are recordable. Recording and Playback: P2 Cards 31
-
 1
1 -
2
-
3
-
4
-
5
-
6
-
7
-
8
-
9
-
10
-
11
-
12
-
13
-
14
-
15
-
16
-
17
-
18
-
19
-
20
-
21
-
22
-
23
-
24
-
25
-
 26
26 -
 27
27 -
 28
28 -
 29
29 -
 30
30 -
 31
31 -
 32
32 -
 33
33 -
 34
34 -
 35
35 -
 36
36 -
37
-
38
-
39
-
40
-
41
-
42
-
43
-
44
-
45
-
46
-
47
-
48
-
49
-
50
-
51
-
52
-
53
-
54
-
55
-
56
-
57
-
58
-
59
-
60
-
61
-
62
-
63
-
64
-
65
-
66
-
67
-
68
-
69
-
70
-
71
-
72
-
73
-
74
-
75
-
76
-
77
-
78
-
79
-
80
-
81
-
82
-
83
-
84
-
85
-
86
-
87
-
88
-
89
-
90
-
91
-
92
-
93
-
94
-
95
-
96
-
97
-
98
-
99
-
100
-
101
-
102
-
103
-
104
-
105
-
106
-
107
-
108
-
109
-
110
-
111
-
112
-
113
-
114
-
115
-
116
-
117
-
118
-
119
-
120
-
121
-
122
-
123
-
124
-
125
-
126
-
127
-
128
-
129
-
130
-
131
-
132
-
133
-
134
-
135
-
136
-
137
-
138
-
139
-
140
-
141
-
142
-
143
-
144
-
145
-
146
-
147
-
148
-
149
-
150
-
151
-
152
-
153
-
154
-
155
-
156
-
157
-
158
-
159
-
160
-
161
-
162
-
163
-
164
-
165
-
166
-
167
-
168
-
169
-
170
-
171
-
172
-
173
-
174
-
175
-
176
-
177
-
178
-
179
-
180
-
181
-
182
-
183
-
184
-
185
-
186
-
187
-
188
-
189
-
190
-
191
-
192
-
193
-
194
-
195
-
196
-
197
-
198
-
199
-
200
-
201
-
202
-
203
-
204
-
205
-
206
 |
 |
