Pioneer 141FD Owner's Manual - Page 10
Color buttons Red, Green, Blue, Yellow - settings
 |
UPC - 012562905761
View all Pioneer 141FD manuals
Add to My Manuals
Save this manual to your list of manuals |
Page 10 highlights
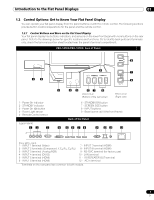
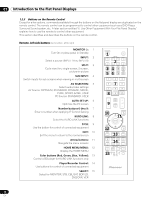
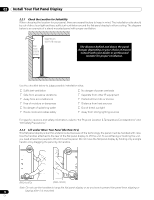
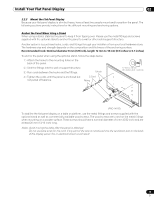
01 Introduction to the Flat Panel Displays 1.2.3 Buttons on the Remote Control Except for a few options, commands available through the buttons on the flat panel display are duplicated on the remote control. The remote control can be programmed to control other equipment such as a DVD Player, Surround Sound system, etc. A later section entitled "6. Use Other Equipment With Your Flat Panel Display" explains how to use the remote to control other equipment. This section identifies and describes the buttons on the remote control. Remote: Left side buttons (top to bottom, left to right) MONITOR : 1 Turn On or place panel in Standby INPUT: 2 Select a source (INPUT 1 thru INPUT 8) SPLIT: 3 Cycle view thru single-screen, 2-screen, picture-in-picture SUB INPUT: 4 Switch inputs for sub screens when viewing in multi-screen AV SELECTION: 5 Select audio/video settings AV Source: OPTIMUM, STANDARD, DYNAMIC, MOVIE, PURE, SPORT, GAME, USER PC Source: STANDARD, USER AUTO SET UP: 6 Optimize the PC screen Number buttons 0 thru 9: 7 Enter a number when applying IP Control Setting KURO LINK: 8 Select the KURO LINK functions P/CH: 9 Use the button for control of connected equipment EXIT: 10 Exit the menu to return to the normal screen Arrow buttons: 11 Navigate the menu screens HOME MENU/MENU: 12 Display the HOME MENU Color buttons (Red, Green, Blue, Yellow): 13 Control a BD player for KURO LINK functions only Player/Recorder Control: 14 Use buttons for control of connected equipment SELECT: 15 Select for MONITOR, STB, CBL/SAT, BDP/LD, DVD/DVR, VCR MONITOR 1 INPUT 1 5 3SPLIT AV 5SELECTION 2 3 2 6 7 SUB 4INPUT SWAP AUTO 6SET UP FREEZE 4 8 PIP SHIFT SCREEN SIZE 1 2 3 7 4 5 6 7 8 9 8KURO LINK 0 CH ENTER 9P/CH DISPLAY INFO MUTING EXIT 10 TOP MENU GUIDE USER MENU 11 TOOLS ENTER HOME MENU 12 MENU 13 ONDEMAND FAVORITE 14 SOURCE RETURN DVD/HDD RECEIVER VOL INPUT SELECT BDP EDIT/LEARN 15MONITOR STB LD VCR CBL DVD SAT DVR 10 En
-
 1
1 -
2
-
3
-
4
-
 5
5 -
 6
6 -
 7
7 -
 8
8 -
 9
9 -
 10
10 -
 11
11 -
 12
12 -
 13
13 -
 14
14 -
 15
15 -
16
-
17
-
18
-
19
-
20
-
21
-
22
-
23
-
24
-
25
-
26
-
27
-
28
-
29
-
30
-
31
-
32
-
33
-
34
-
35
-
36
-
37
-
38
-
39
-
40
-
41
-
42
-
43
-
44
-
45
-
46
-
47
-
48
-
49
-
50
-
51
-
52
-
53
-
54
-
55
-
56
-
57
-
58
-
59
-
60
-
61
-
62
-
63
-
64
-
65
-
66
-
67
-
68
-
69
-
70
-
71
-
72
-
73
-
74
-
75
-
76
-
77
-
78
-
79
-
80
-
81
-
82
-
83
-
84
-
85
-
86
-
87
-
88
-
89
-
90
-
91
-
92
-
93
-
94
-
95
-
96
-
97
-
98
-
99
-
100
-
101
-
102
-
103
-
104
-
105
-
106
 |
 |