Pioneer 141FD Owner's Manual - Page 66
The Virtual Remote Control appears on screen.
 |
UPC - 012562905761
View all Pioneer 141FD manuals
Add to My Manuals
Save this manual to your list of manuals |
Page 66 highlights
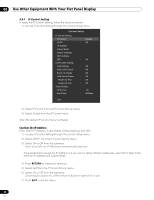
06 Use Other Equipment With Your Flat Panel Display "Virtual" Remote Control Settings 1 ) Enter your IP Address in the browser's address box. 2 ) Enter "admin" on the password entry screen. The Virtual Remote Control appears on screen. 3 ) Click the desired button to execute a command. No Frame >> Model : ****** Name : ****** Location : ****** ****** To p Detail Settings Picture Terminal Functions INPUT1 INPUT5 ON INPUT2 INPUT6 STANDBY INPUT3 INPUT7 INPUT4 INPUT8 SPLIT AV SELECTION DISPLAY SUB INPUT AUTO SETUP SWAP FREEZE PIP SHIFT SCREEN SIZE EXIT UP USER MENU Network Settings Network E-mail ISF LEFT ENTER RIGHT HOME MENU DOWN RETURN TOP : Virtual Remote Web control system Picture Adjustments Click Picture to display the picture adjustment screen. Model : ****** Name : ****** Location : ****** ****** To p Detail Settings Picture Terminal Functions Network Settings Network E-mail ISF Message Power Input AV Selection : ERR MSG : ON :1 2 OPTIMUM : USER Picture Web control system STANDBY 3 4 STANDARD MOVIE 5 6 DYNAMIC isf-DAY 7 8 PURE isf-NIGHT SPORT isf-AUTO GAME Detail Adjust Picture Contrast Brightness Color : 40 Set 0 Set 0 Color Temp. : Manual R.High White Balance : 0 Set G.High Set 0 B.High Set 0 R.Low 0 G.Low Set 0 B.Low Set 0 Gamma : 3 Blue only mode : Off Screen size : Cinema 14:9 Set Set Set Auto Setup Tint Set 0 Sharpness Set 0 Set Set Set Reset Note: While operating on the web screen, using the remote or buttons on the flat panel display to directly control the panel can cause the operational status on the web screen to differ from the panel status. To find the needed screen on the panel, select the appropriate menu on the left. 66 En
-
 1
1 -
2
-
3
-
4
-
5
-
6
-
7
-
8
-
9
-
10
-
11
-
12
-
13
-
14
-
15
-
16
-
17
-
18
-
19
-
20
-
21
-
22
-
23
-
24
-
25
-
26
-
27
-
28
-
29
-
30
-
31
-
32
-
33
-
34
-
35
-
36
-
37
-
38
-
39
-
40
-
41
-
42
-
43
-
44
-
45
-
46
-
47
-
48
-
49
-
50
-
51
-
52
-
53
-
54
-
55
-
56
-
57
-
58
-
59
-
60
-
 61
61 -
 62
62 -
 63
63 -
 64
64 -
 65
65 -
 66
66 -
 67
67 -
 68
68 -
 69
69 -
 70
70 -
 71
71 -
72
-
73
-
74
-
75
-
76
-
77
-
78
-
79
-
80
-
81
-
82
-
83
-
84
-
85
-
86
-
87
-
88
-
89
-
90
-
91
-
92
-
93
-
94
-
95
-
96
-
97
-
98
-
99
-
100
-
101
-
102
-
103
-
104
-
105
-
106
 |
 |
