Pioneer 141FD Owner's Manual - Page 34
AV Option, Description, PC Option - parts
 |
UPC - 012562905761
View all Pioneer 141FD manuals
Add to My Manuals
Save this manual to your list of manuals |
Page 34 highlights
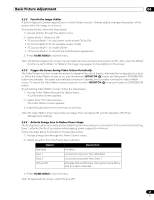
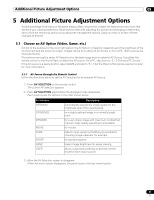
05 Additional Picture Adjustment Options Manual Screen Sizing Manually select an appropriate screen size if an image fails to appear in the correct format. Browse the menu for the specific video signal's correct screen size. The selectable screen sizes differ depending on the type of input signal. While watching video content, press SCREEN SIZE on the remote control to cycle the picture through Auto, FULL, Dot by Dot, ZOOM, CINEMA, 4:3, WIDE, WIDE 1, WIDE 2, FULL 14:9 and CINEMA 14:9. Freely change the screen size during video from other input sources. Auto is available when receiving HD pictures. The following chart provides information about how the screen appears for each option. AV Option Auto FULL (FULL 14:9) Dot by Dot ZOOM CINEMA CINEMA 14:9 4:3 WIDE WIDE 1 WIDE 2 PC Option 4:3 FULL Description adds side masks or displays the image in full screen when detecting HD pictures containing side masks (See Detect Masks on page 36) squeezes 16:9 (14:9) images matches input signal to the same number of screen pixels (available for 1080i or 1080p signals only) bars may appear on the top and bottom on some pictures that are 16:9 letterbox bars may appear on the top and bottom on some pictures that are 14:9 letterbox (available for SD signals only) side bars appear on each side pictures progressively stretch toward each side (available for SD signals only) pictures progressively stretch toward each side (available for HD signals only) pictures evenly stretch toward each side (available for HD signals only) Description fills without altering the input signal aspect ratio shows 16:9 screen display With WIDE 1 or WIDE 2 selected, a High Definition (HD) picture image or menu may run off the edge of the screen. If an image or menu appears cut or cropped, change the option to FULL. Avoid showing signals that fill only part of the screen. Images that fail to fill the screen may cause temporary or permanent image retention depending on the frequency and duration. For example, an HD picture with side masks (4:3 content) causes uneven wear of the plasma cells. If side masks appear around a broadcast, after that movie or program is over, switch to a full screen motion video. This action helps the panel balance wear for the plasma cells and guard against after-image issues. For more information about Masks, refer to "5.3.1 Adjust for Screen Masking (black bars on sides)." Note: Not all video signals carry alternative screen sizes. 34 En
-
 1
1 -
2
-
3
-
4
-
5
-
6
-
7
-
8
-
9
-
10
-
11
-
12
-
13
-
14
-
15
-
16
-
17
-
18
-
19
-
20
-
21
-
22
-
23
-
24
-
25
-
26
-
27
-
28
-
 29
29 -
 30
30 -
 31
31 -
 32
32 -
 33
33 -
 34
34 -
 35
35 -
 36
36 -
 37
37 -
 38
38 -
 39
39 -
40
-
41
-
42
-
43
-
44
-
45
-
46
-
47
-
48
-
49
-
50
-
51
-
52
-
53
-
54
-
55
-
56
-
57
-
58
-
59
-
60
-
61
-
62
-
63
-
64
-
65
-
66
-
67
-
68
-
69
-
70
-
71
-
72
-
73
-
74
-
75
-
76
-
77
-
78
-
79
-
80
-
81
-
82
-
83
-
84
-
85
-
86
-
87
-
88
-
89
-
90
-
91
-
92
-
93
-
94
-
95
-
96
-
97
-
98
-
99
-
100
-
101
-
102
-
103
-
104
-
105
-
106
 |
 |