Samsung SM-G870A User Manual Att Galaxy S5 Sm-g870a Kit Kat English User Manua - Page 113
Air view, Accounts, Palm swipe to capture, Adding an Account
 |
View all Samsung SM-G870A manuals
Add to My Manuals
Save this manual to your list of manuals |
Page 113 highlights
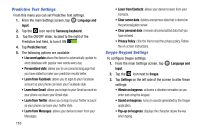
Palm swipe to capture Once enabled, you can capture any on-screen information swiping across the screen. In a single motion, press the side of your hand on the screen and swipe form left to right. 1. From the main Settings screen, tap Motions and gestures ➔ Palm swipe to capture. 2. In a single motion touch and slide the slider to the right to turn it on . 3. You can find the captured screen in the Images section in My Files and in your Gallery. Air view When Air view is enabled, it displays helpful information when you hover your finger over the screen. You can use the Air view feature in your Calendar, Gallery, Video Player, and on your phone. 1. From the main Settings screen, tap Air view. 2. In a single motion touch and slide the slider to the right to turn it on . Accounts This menu allows you to set up, manage, and synchronize your accounts. Ⅲ From the main Settings screen, tap Adding an Account 1. From the main Settings screen, tap Add account. Accounts. Accounts ➔ 2. Tap one of the account types. 3. Use the keyboard and follow the prompts to enter your credentials and set up the account. A green circle will appear next to the account type once you have created an account. Your email account will also be displayed in the My Accounts section of the main Accounts menu. Changing Your Settings 105
-
 1
1 -
2
-
3
-
4
-
5
-
6
-
7
-
8
-
9
-
10
-
11
-
12
-
13
-
14
-
15
-
16
-
17
-
18
-
19
-
20
-
21
-
22
-
23
-
24
-
25
-
26
-
27
-
28
-
29
-
30
-
31
-
32
-
33
-
34
-
35
-
36
-
37
-
38
-
39
-
40
-
41
-
42
-
43
-
44
-
45
-
46
-
47
-
48
-
49
-
50
-
51
-
52
-
53
-
54
-
55
-
56
-
57
-
58
-
59
-
60
-
61
-
62
-
63
-
64
-
65
-
66
-
67
-
68
-
69
-
70
-
71
-
72
-
73
-
74
-
75
-
76
-
77
-
78
-
79
-
80
-
81
-
82
-
83
-
84
-
85
-
86
-
87
-
88
-
89
-
90
-
91
-
92
-
93
-
94
-
95
-
96
-
97
-
98
-
99
-
100
-
101
-
102
-
103
-
104
-
105
-
106
-
107
-
 108
108 -
 109
109 -
 110
110 -
 111
111 -
 112
112 -
 113
113 -
 114
114 -
 115
115 -
 116
116 -
 117
117 -
 118
118 -
119
-
120
-
121
-
122
-
123
-
124
-
125
-
126
-
127
-
128
-
129
-
130
-
131
-
132
-
133
-
134
-
135
-
136
-
137
-
138
-
139
-
140
-
141
-
142
-
143
-
144
-
145
-
146
-
147
-
148
-
149
-
150
-
151
-
152
-
153
-
154
-
155
-
156
-
157
-
158
-
159
-
160
-
161
-
162
-
163
-
164
-
165
-
166
-
167
-
168
-
169
-
170
-
171
-
172
-
173
-
174
-
175
-
176
-
177
-
178
-
179
-
180
-
181
-
182
-
183
-
184
-
185
-
186
-
187
-
188
-
189
-
190
-
191
-
192
-
193
-
194
-
195
-
196
-
197
-
198
-
199
-
200
-
201
-
202
-
203
-
204
-
205
-
206
-
207
-
208
-
209
-
210
-
211
-
212
-
213
 |
 |
