Sharp MX 4501N Installation Manual - Page 14
Tray setup - how to load staples
 |
View all Sharp MX 4501N manuals
Add to My Manuals
Save this manual to your list of manuals |
Page 14 highlights
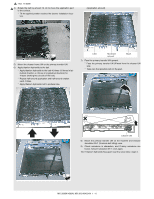
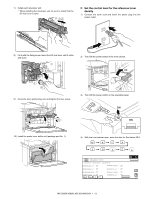
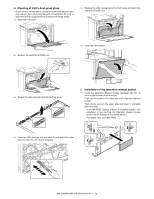
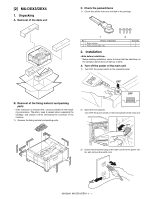
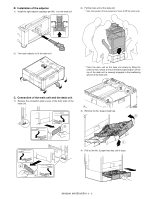
J. Tray setup (1) Simulation setup This is used to specify the paper type, paper size, and functions used for each paper tray. 1) Press the [SYSTEM SETTINGS] key. SYSTEM SETTINGS 2) Touch the [Paper Tray Settings] key. System Settings Admin Password Exit Total Count Paper Tray Settings Printer Condition Settings Default Settings Address Control Document Filing Control List Print (User) Fax Data Receive/Forward USB-Device Check 3) Touch the [Tray Settings] key. System Settings Paper Tray Settings OK Tray Settings Paper Type Registration Auto Tray Switching 4) Select the tray that you wish to configure. (1) If needed, use the keys to switch through the trays. (2) Touch the [Type/Size] key. System Settings Paper Tray Settings Type / Size Tray 1 Plain / A4 Print Copy Doc. Fax I-Fax Filing OK 1/6 Fixed Paper Side Disable Duplex Disable Staple Disable Punch (2) 5) Touch the desired paper type. Example: Tray 1 is selected System Settings Tray 1 Type/Size Setting Select the paper type. Plain Pre-Printed Recycled Letter Head Pre-Punched Colour (1) Cancel 1/2 1/2 System Settings Tray 1 Type/Size Setting Select the paper type. User Type 1 User Type 5 User Type 2 User Type 6 User Type 3 User Type 7 Cancel 2/2 User Type 4 1/2 6) Select the paper size. (1) Touch the desired paper size. (2) Touch the [OK] key. (1) System Settings Tray 1 Type/Size Setting Type Plain A3 A5R B5R Size A4 B4 216x330(81/2x13) Type A4R B5 (2) OK 1/3 2/2 (1) System Settings Tray 1 Type/Size Setting Type Plain 11x17 81/2x11 Size 81/2x14 71/4x101/2R (2) Type OK 2/3 81/2x11 51/2x81/2R (1) System Settings Tray 1 Type/Size Setting Type Plain 8K Size 16K 2/2 (2) Type 16KR OK 3/3 2/2 (2) Tray size setup 1) Pull out the paper tray. Gently pull the tray out until it stops. If paper remains in the tray, remove it. 2) Adjust the guide plates A and B by squeezing their lock levers and sliding them to match the vertical and horizontal dimensions of the paper to be loaded. The guide plates A and B are slidable. Slide each guide plate while squeezing its lock lever. A B MX-3500N/4500N, MX-3501N/4501N 1 - 11
-
 1
1 -
2
-
3
-
4
-
5
-
6
-
7
-
8
-
 9
9 -
 10
10 -
 11
11 -
 12
12 -
 13
13 -
 14
14 -
 15
15 -
 16
16 -
 17
17 -
 18
18 -
 19
19 -
20
-
21
-
22
-
23
-
24
-
25
-
26
-
27
-
28
-
29
-
30
-
31
-
32
-
33
-
34
-
35
-
36
-
37
-
38
-
39
-
40
-
41
-
42
-
43
-
44
-
45
-
46
-
47
-
48
-
49
-
50
-
51
-
52
-
53
-
54
-
55
-
56
-
57
-
58
-
59
-
60
-
61
-
62
-
63
-
64
-
65
-
66
-
67
-
68
-
69
-
70
-
71
-
72
 |
 |
