Sharp MX 4501N Installation Manual - Page 54
Harness A Purple, Harness B Orange, Clamp, CN14 on the PWB connected, CN12 on the PWB connected,
 |
View all Sharp MX 4501N manuals
Add to My Manuals
Save this manual to your list of manuals |
Page 54 highlights
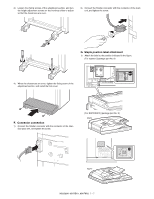
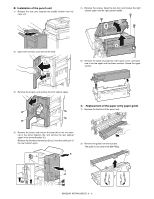
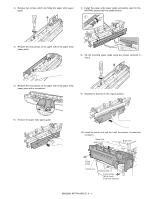
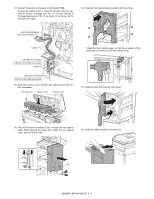
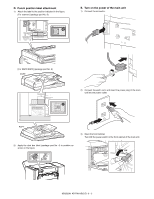
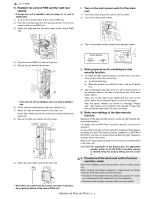
11) Connect the punch unit harness to the finisher PWB. Remove the clamp which is fixing the harness. Wire the harness A (Purple) (package part No. 1) and the harness B (Orange) (package part No. 2) as shown in the figure, and fix them with the clamp. 14) Install the front cabinet upper and fix it with the screws. Harness B (Orange) Harness A (Purple) Clamp * Install the front cabinet upper so that the projection of the latch arm is in the hole in the lock release lever. Harness B (Orange) CN14 on the PWB connected Clamp Harness A (Purple) CN12 on the PWB connected 12) Open the top door, and install the right cabinet upper and fix it with the screws. Fixing screw Upper cover Fixing screw 15) Install the knob and close the front cover. 2 1 13) Pass the interface harnesses (2 pcs.) through the rear cabinet upper. While opening the upper door, install the rear cabinet upper, and fix it with screws. 16) Install the saddle finisher to the main unit. MX3500N AR-PN1A/B/C/D 8 - 4
-
 1
1 -
2
-
3
-
4
-
5
-
6
-
7
-
8
-
9
-
10
-
11
-
12
-
13
-
14
-
15
-
16
-
17
-
18
-
19
-
20
-
21
-
22
-
23
-
24
-
25
-
26
-
27
-
28
-
29
-
30
-
31
-
32
-
33
-
34
-
35
-
36
-
37
-
38
-
39
-
40
-
41
-
42
-
43
-
44
-
45
-
46
-
47
-
48
-
 49
49 -
 50
50 -
 51
51 -
 52
52 -
 53
53 -
 54
54 -
 55
55 -
 56
56 -
 57
57 -
 58
58 -
 59
59 -
60
-
61
-
62
-
63
-
64
-
65
-
66
-
67
-
68
-
69
-
70
-
71
-
72
 |
 |
