Sharp MX 4501N Installation Manual - Page 47
Connection of the main unit and saddle, finisher, Staple unit installation
 |
View all Sharp MX 4501N manuals
Add to My Manuals
Save this manual to your list of manuals |
Page 47 highlights
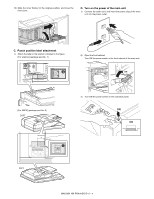
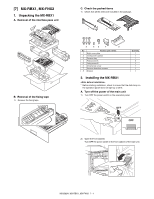
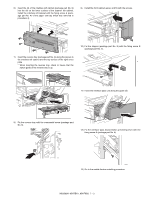
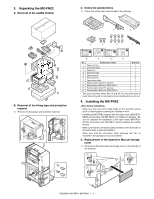
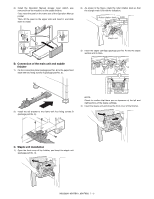
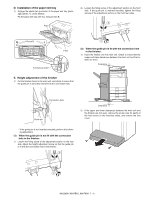
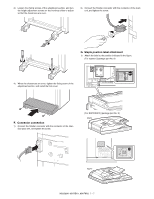
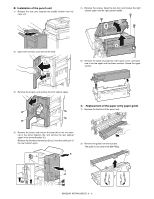
2) Install the Operation Manual storage cover (which was removed from the machine) to the saddle finisher. First, insert the pawl on the lower side of the Operation Manual pocket. Then, lift the pawl on the upper side and insert it, and slide down to install. 2) As shown in the figure, rotate the roller rotation knob so that the triangle mark is fit with the indication. Roller rotation knob 2 1 Staple unit 1 3) Insert the staple cartridge (package part No. 4) into the staple section until it clicks. B. Connection of the main unit and saddle finisher 1) Fix the connection plate (package part No. 2) to the paper feed desk with two fixing screws A (package part No. 5). 2) Install the rail bracket to the frame with four fixing screws B (package part No. 6). NOTE: Check to confirm that there are no clearance at the left and right sections of the staple cartridge. 4) Insert the staple unit and close the front cover of the finisher. C. Staple unit installation 1) Open the front cover of the finisher, and insert the staple unit (package part No. 3). MX3500N MX-RBX1, MX-FNX2 7 - 5
-
 1
1 -
2
-
3
-
4
-
5
-
6
-
7
-
8
-
9
-
10
-
11
-
12
-
13
-
14
-
15
-
16
-
17
-
18
-
19
-
20
-
21
-
22
-
23
-
24
-
25
-
26
-
27
-
28
-
29
-
30
-
31
-
32
-
33
-
34
-
35
-
36
-
37
-
38
-
39
-
40
-
41
-
 42
42 -
 43
43 -
 44
44 -
 45
45 -
 46
46 -
 47
47 -
 48
48 -
 49
49 -
 50
50 -
 51
51 -
 52
52 -
53
-
54
-
55
-
56
-
57
-
58
-
59
-
60
-
61
-
62
-
63
-
64
-
65
-
66
-
67
-
68
-
69
-
70
-
71
-
72
 |
 |
