Sharp MX 4501N Installation Manual - Page 7
Fusing heat roller pressing F/R, Primary transfer and transfer belt protection, sheet disassembly/ - drum
 |
View all Sharp MX 4501N manuals
Add to My Manuals
Save this manual to your list of manuals |
Page 7 highlights
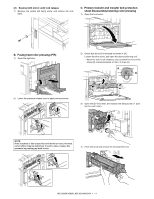
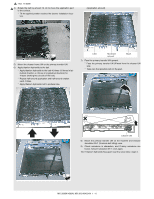
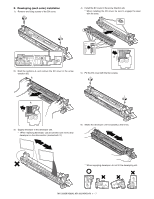
(2) Scanner (2/3 mirror unit) lock release 1) Remove the optical unit fixing screw, and remove the note label. C. Primary transfer and transfer belt protection sheet disassembly/cleaning roller pressing 1) Open the front cover. B. Fusing heat roller pressing (F/R) 1) Open the right door. 2 1 2) Check that the lock is released as shown in (A). Loosen the blue screw, and open the drum positioning unit. * When the lock is not released, use a screwdriver to turn the screw (B) counterclockwise so that it is fit as (A). A B 2) Lower the pressure release lever to apply more pressure. 3) Open the DV lock lever, and release the fixing screw. (1 position for each color) 1 2 NOTE: If the machine is left unused for one month or more, the heat roller rubber may be deformed. In such a case, release the pressure by pushing up both levers. 4) Pinch the knob and remove the development unit. MX-3500N/4500N, MX-3501N/4501N 1 - 4
-
 1
1 -
 2
2 -
 3
3 -
 4
4 -
 5
5 -
 6
6 -
 7
7 -
 8
8 -
 9
9 -
 10
10 -
 11
11 -
 12
12 -
13
-
14
-
15
-
16
-
17
-
18
-
19
-
20
-
21
-
22
-
23
-
24
-
25
-
26
-
27
-
28
-
29
-
30
-
31
-
32
-
33
-
34
-
35
-
36
-
37
-
38
-
39
-
40
-
41
-
42
-
43
-
44
-
45
-
46
-
47
-
48
-
49
-
50
-
51
-
52
-
53
-
54
-
55
-
56
-
57
-
58
-
59
-
60
-
61
-
62
-
63
-
64
-
65
-
66
-
67
-
68
-
69
-
70
-
71
-
72
 |
 |
