Sharp MX 4501N Installation Manual - Page 6
Installation - waste toner
 |
View all Sharp MX 4501N manuals
Add to My Manuals
Save this manual to your list of manuals |
Page 6 highlights
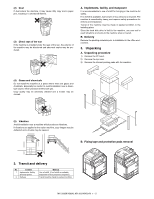
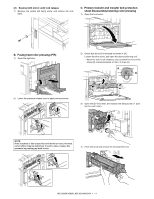
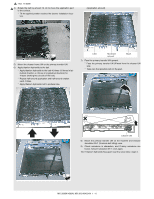
DSPF MODEL ONLY D. Check the parts packed together 1) Check that all the parts are in the package. 1 2 3 C. Removal of parts packed together No. Parts name 1 Waste toner bottle unit 2 Operation manual 3 Operation manual pocket Quantity 1 1 1 4. Installation * When connecting the main unit with the optional one-tier paper feed desk (MX-DEX3) or two-tier paper feed desk (MX-DEX4), first unpack and install the one-tier paper feed desk (MX-DEX3) or two-tier paper feed desk (MX-DEX4); then unpack the main unit and securely place the main unit on the MX-DEX3 or MXDEX4 (see 2-2) before installing the main unit. A. Lock release (1) Tray rotation plate lock release 1) Pull out the tray, and remove the rotation plate fixing material and the tray note label. 2) Attach the removed fixing material to the position shown in the figure for storage. MX-3500N/4500N, MX-3501N/4501N 1 - 3
-
 1
1 -
 2
2 -
 3
3 -
 4
4 -
 5
5 -
 6
6 -
 7
7 -
 8
8 -
 9
9 -
 10
10 -
 11
11 -
 12
12 -
13
-
14
-
15
-
16
-
17
-
18
-
19
-
20
-
21
-
22
-
23
-
24
-
25
-
26
-
27
-
28
-
29
-
30
-
31
-
32
-
33
-
34
-
35
-
36
-
37
-
38
-
39
-
40
-
41
-
42
-
43
-
44
-
45
-
46
-
47
-
48
-
49
-
50
-
51
-
52
-
53
-
54
-
55
-
56
-
57
-
58
-
59
-
60
-
61
-
62
-
63
-
64
-
65
-
66
-
67
-
68
-
69
-
70
-
71
-
72
 |
 |
