Sharp MX 4501N Installation Manual - Page 59
Procedure of the document control function
 |
View all Sharp MX 4501N manuals
Add to My Manuals
Save this manual to your list of manuals |
Page 59 highlights
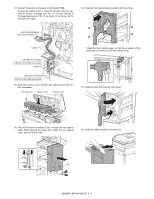
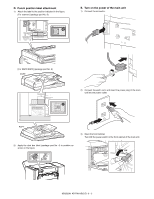
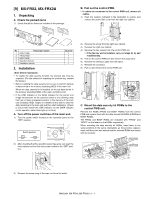
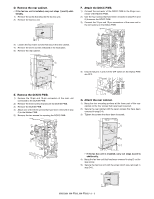
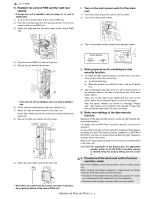
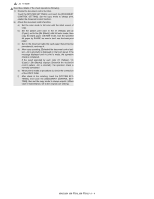
3 : Jul. 15 2006 H. Reattach the control PWB and the right rear cabinet. • If the fax box unit is installed, carry out steps 1), 2), and 3) additionally. 1) Connect the interface cable to the control PWB unit. 2) Push the interface cable into the recessed portion of the sheet metal on the control PWB unit. 3) Attach the snap band to the sheet metal of the control PWB unit. I. Turn on the main power switch of the main unit. 1) Insert the power plug of the main unit to the outlet. 2) Turn on the main power switch. 3) Turn on the power switch located on the operation panel. 4) Push the control PWB unit into the main unit. 5) Secure the unit with the two screws. • If the fax box unit is installed, carry out step 6) additionally. 6) Fit the interface cable into the right rear cabinet cover. 7) Attach the right rear cabinet cover to the main unit. At this time, check that the four hooks are properly fitted to the main unit. 8) Secure the right rear cabinet with the screw. 9) Attach the ozone filter cover to the main unit. • Reconnect the cables that have been removed in step B to the original positions of the control PWB unit. J. Make preparations for enabling the data security function. 1) To enable the data security function, use the keys on the operation panel to enter the product key. a) Touch [Product Key]. b) Enter the product key with the 10-key, and touch [Enter] key. 2) After completing product key entry, turn off the power switch on the operation panel of the main unit and then turn off the main power switch. Then, turn on the main power switch and then turn on the power switch on the operation panel of the main unit again. After the power switches are turned on, message "Please wait." may appear and encryption and deletion of data may take several minutes before the main unit starts. K. Make user settings of the data security function. Operation of the data security function can be set with System Settings (Administrator). For details, see the MX-FRX1U operation manual, and check the operation. If some files have been stored using the document filing function (including the quick file function) before installation of MX-FRX1/ MX-FRX1U, be sure to execute [Clear All Memory] after installation to delete all the stored files. Restore the stored back up data into the memory (including HDD) of the main unit. CAUTION: For acquisition of the product key, the application number written in the MX-FRX1U operation manual is needed. Keep this manual taking care not to lose it. 3 L. Procedure of the document control function operation check When first installing, check the document control function operation. When carrying out machine changing or maintenance as follows, check the document control function operation. • Replacement that might adversely affect copy quality. (For exam- ple, replacement of the transfer belts or the developer.) • Replacement that might adversely affect scanning quality. MX3500N MX-FRX2, MX-FRX2U 9 - 3
-
 1
1 -
2
-
3
-
4
-
5
-
6
-
7
-
8
-
9
-
10
-
11
-
12
-
13
-
14
-
15
-
16
-
17
-
18
-
19
-
20
-
21
-
22
-
23
-
24
-
25
-
26
-
27
-
28
-
29
-
30
-
31
-
32
-
33
-
34
-
35
-
36
-
37
-
38
-
39
-
40
-
41
-
42
-
43
-
44
-
45
-
46
-
47
-
48
-
49
-
50
-
51
-
52
-
53
-
 54
54 -
 55
55 -
 56
56 -
 57
57 -
 58
58 -
 59
59 -
 60
60 -
 61
61 -
 62
62 -
 63
63 -
 64
64 -
65
-
66
-
67
-
68
-
69
-
70
-
71
-
72
 |
 |
