Sharp MX 4501N Installation Manual - Page 40
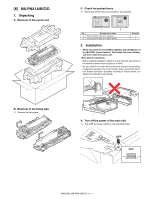
Installation of the punch unit
 |
View all Sharp MX 4501N manuals
Add to My Manuals
Save this manual to your list of manuals |
Page 40 highlights
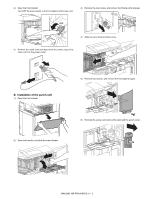
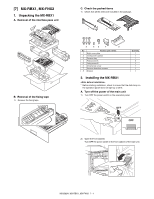
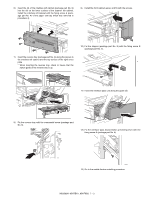
2) Open the front cabinet. Turn OFF the power switch in the front cabinet of the main unit. 3) Remove the coin screw, and remove the finisher slide stopper. OFF 4) Slide the inner finisher further more. 3) Remove the earth cord and disconnect the power plug of the main unit from the power outlet. B. Installation of the punch unit 1) Open the front cabinet. 2) Open the front lid, and slide the inner finisher. 2 1 5) Remove two screws, and remove the front cabinet upper. 6) Remove the screw, and remove the band and the punch cover. MX3500N MX-PNX1A/B/C/D 6 - 2
-
 1
1 -
2
-
3
-
4
-
5
-
6
-
7
-
8
-
9
-
10
-
11
-
12
-
13
-
14
-
15
-
16
-
17
-
18
-
19
-
20
-
21
-
22
-
23
-
24
-
25
-
26
-
27
-
28
-
29
-
30
-
31
-
32
-
33
-
34
-
 35
35 -
 36
36 -
 37
37 -
 38
38 -
 39
39 -
 40
40 -
 41
41 -
 42
42 -
 43
43 -
 44
44 -
 45
45 -
46
-
47
-
48
-
49
-
50
-
51
-
52
-
53
-
54
-
55
-
56
-
57
-
58
-
59
-
60
-
61
-
62
-
63
-
64
-
65
-
66
-
67
-
68
-
69
-
70
-
71
-
72
 |
 |

MX3500N
MX-PNX1A/B/C/D
6 – 2
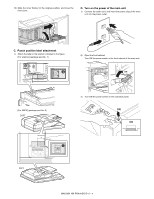
2)
Open the front cabinet.
Turn OFF the power switch in the front cabinet of the main unit.
3)
Remove the earth cord and disconnect the power plug of the
main unit from the power outlet.
B.
Installation of the punch unit
1)
Open the front cabinet.
2)
Open the front lid, and slide the inner finisher.
3)
Remove the coin screw, and remove the finisher slide stopper.
4)
Slide the inner finisher further more.
5)
Remove two screws, and remove the front cabinet upper.
6)
Remove the screw, and remove the band and the punch cover.
OFF
2
1