Sharp MX 4501N Installation Manual - Page 37
Connector connection, Staple position label attachment
 |
View all Sharp MX 4501N manuals
Add to My Manuals
Save this manual to your list of manuals |
Page 37 highlights
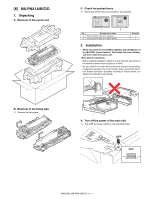
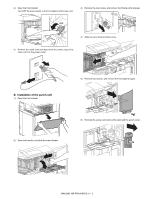
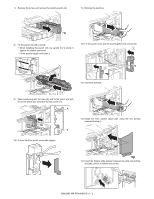
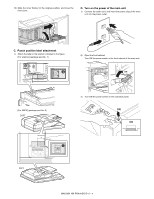
12) After pushing the intermediate rail of accuride, insert the finisher slide stopper (package part No. 7) between the rear slide rail and the accuride. Fix it with the coin screw (package part No. 10). D. Connector connection 1) Remove the protection material and fixing tape. 1 2 13) Install the front open/close cover (package part No. 4) to the front rail stay rotating shaft, and fix it with the resin clip (package part No. 9). 2 2) Remove the screw, and remove the connector cover. 1 14) Fix the punch cover (package part No. 5) together with the band (metal fixture) with the fixing screw (package part No. 8). 1 3) Connect the finisher connector with the main unit connector, and tighten with a screw. 2 15) Install the front cabinet upper with two screws. E. Staple position label attachment 1) Attach the label to the position indicated in the figure. [For scanner] (package part No. 11) Corner R end fitting Label attachment reference * Corner of the "upper cabinet rear" Corner R end fitting MX3500N MX-FNX1 5 - 4
-
 1
1 -
2
-
3
-
4
-
5
-
6
-
7
-
8
-
9
-
10
-
11
-
12
-
13
-
14
-
15
-
16
-
17
-
18
-
19
-
20
-
21
-
22
-
23
-
24
-
25
-
26
-
27
-
28
-
29
-
30
-
31
-
 32
32 -
 33
33 -
 34
34 -
 35
35 -
 36
36 -
 37
37 -
 38
38 -
 39
39 -
 40
40 -
 41
41 -
 42
42 -
43
-
44
-
45
-
46
-
47
-
48
-
49
-
50
-
51
-
52
-
53
-
54
-
55
-
56
-
57
-
58
-
59
-
60
-
61
-
62
-
63
-
64
-
65
-
66
-
67
-
68
-
69
-
70
-
71
-
72
 |
 |
