Sharp MX 4501N Installation Manual - Page 20
front side, and fix them with the fixing screws package part
 |
View all Sharp MX 4501N manuals
Add to My Manuals
Save this manual to your list of manuals |
Page 20 highlights
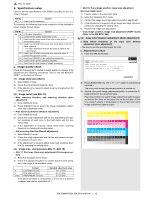
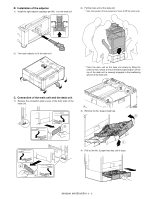
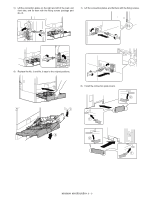
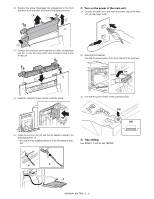
5) Lift the connection plates on the right and left of the main unit front side, and fix them with the fixing screws (package part No. 2). 7) Lift the connection plates, and fix them with the fixing screws. 6) Replace the No. 3 and No. 2 trays to the original positions. 8) Install the connection plate covers. 2 1 1 2 2 1 MX3500N MX-DEX3/DEX4 2 - 3
-
 1
1 -
2
-
3
-
4
-
5
-
6
-
7
-
8
-
9
-
10
-
11
-
12
-
13
-
14
-
 15
15 -
 16
16 -
 17
17 -
 18
18 -
 19
19 -
 20
20 -
 21
21 -
 22
22 -
 23
23 -
 24
24 -
 25
25 -
26
-
27
-
28
-
29
-
30
-
31
-
32
-
33
-
34
-
35
-
36
-
37
-
38
-
39
-
40
-
41
-
42
-
43
-
44
-
45
-
46
-
47
-
48
-
49
-
50
-
51
-
52
-
53
-
54
-
55
-
56
-
57
-
58
-
59
-
60
-
61
-
62
-
63
-
64
-
65
-
66
-
67
-
68
-
69
-
70
-
71
-
72
 |
 |

MX3500N
MX-DEX3/DEX4
2 – 3
5)
Lift the connection plates on the right and left of the main unit
front side, and fix them with the fixing screws (package part
No. 2).
6)
Replace the No. 3 and No. 2 trays to the original positions.
7)
Lift the connection plates, and fix them with the fixing screws.
8)
Install the connection plate covers.
1
2
2
1
2
1