Sharp MX 4501N Installation Manual - Page 62
] AR-PF1
 |
View all Sharp MX 4501N manuals
Add to My Manuals
Save this manual to your list of manuals |
Page 62 highlights
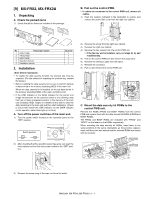
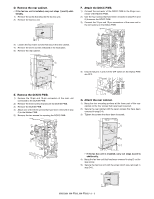
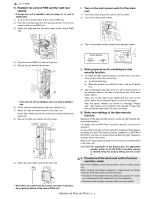
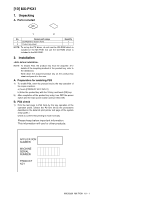
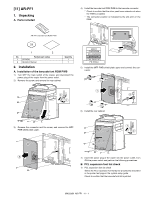
[M1X135]00AN R-PF1 1. Unpacking A. Parts included S4)erIvnsitaclletheMbaanrcuoadelfont ROM PWB to the barcode connector. * Check to confirm that the silver push lever extends out when the PWB is installed. * The connector position is indicated by the silk print on the PWB. AR-PF1 barcode font ROM PWB 1 2 No. Packed part names 1 CD-ROM 2 Operation Manual Quantity 1 1 2. Installation A. Installation of the barcode font ROM PWB 1) Turn OFF the main switch of the copier, and disconnect the power plug of the copier from the power outlet. 2) Remove the screw, and remove the rear cabinet. BOOT PROGRAM PCL/BUMON BARCODE FAX IMG EXT PS KANJI 5) Install the MFP PWB shield plate upper and connect the connector. 1 2 2 1 6) Install the rear cabinet. 3) Remove the connector and the screw, and remove the MFP PWB shield plate upper. 1 2 1 2 7) Insert the power plug of the copier into the power outlet. Turn ON the power switch and perform the following procedures. B. PCL expansion font list check 1) PCL expansion font list check Select the PCL expansion font list by the procedures described in the printer test page in the system setup guide. Check to confirm that the barcode font list is printed. MX3500N AR-PF1 11 - 1
-
 1
1 -
2
-
3
-
4
-
5
-
6
-
7
-
8
-
9
-
10
-
11
-
12
-
13
-
14
-
15
-
16
-
17
-
18
-
19
-
20
-
21
-
22
-
23
-
24
-
25
-
26
-
27
-
28
-
29
-
30
-
31
-
32
-
33
-
34
-
35
-
36
-
37
-
38
-
39
-
40
-
41
-
42
-
43
-
44
-
45
-
46
-
47
-
48
-
49
-
50
-
51
-
52
-
53
-
54
-
55
-
56
-
 57
57 -
 58
58 -
 59
59 -
 60
60 -
 61
61 -
 62
62 -
 63
63 -
 64
64 -
 65
65 -
 66
66 -
 67
67 -
68
-
69
-
70
-
71
-
72
 |
 |
