Sharp MX 4501N Installation Manual - Page 52
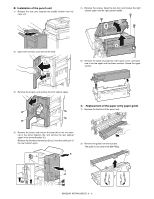
Installation of the punch unit, Replacement of the paper entry paper guide
 |
View all Sharp MX 4501N manuals
Add to My Manuals
Save this manual to your list of manuals |
Page 52 highlights
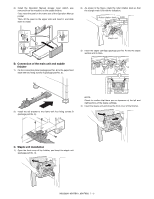
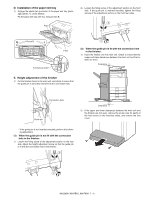
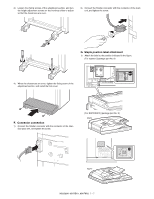
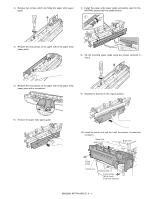
B. Installation of the punch unit 1) Release the lock and separate the saddle finisher from the main unit. 5) Remove the screws. Open the top door and remove the right cabinet upper and the right cabinet middle. 1 2) Open the front door, and remove the knob. 1 2 6) Remove the pawls (2 positions) of the upper cover, and separate it into the upper and the lower sections. Reuse the upper section. 2 3) Remove the screws, and remove the front cabinet upper. C. Replacement of the paper entry paper guide 1) Remove the dust box of the punch unit. 4) Remove the screw, and remove the pawl (A) on the rear cabinet in the arrow direction (B), and remove the rear cabinet upper in the arrow direction (C). Remove the interface harnesses (2 pcs.) from the outlet port of the rear cabinet upper. B A 2) Remove the guide from the dust box. The guide is not used in the MX-FNX2. C MX3500N AR-PN1A/B/C/D 8 - 2
-
 1
1 -
2
-
3
-
4
-
5
-
6
-
7
-
8
-
9
-
10
-
11
-
12
-
13
-
14
-
15
-
16
-
17
-
18
-
19
-
20
-
21
-
22
-
23
-
24
-
25
-
26
-
27
-
28
-
29
-
30
-
31
-
32
-
33
-
34
-
35
-
36
-
37
-
38
-
39
-
40
-
41
-
42
-
43
-
44
-
45
-
46
-
 47
47 -
 48
48 -
 49
49 -
 50
50 -
 51
51 -
 52
52 -
 53
53 -
 54
54 -
 55
55 -
 56
56 -
 57
57 -
58
-
59
-
60
-
61
-
62
-
63
-
64
-
65
-
66
-
67
-
68
-
69
-
70
-
71
-
72
 |
 |
