Sharp MX 4501N Installation Manual - Page 53
MX-FNX2 packed with the saddle finisher.
 |
View all Sharp MX 4501N manuals
Add to My Manuals
Save this manual to your list of manuals |
Page 53 highlights
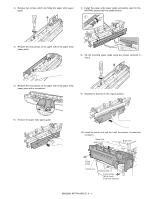
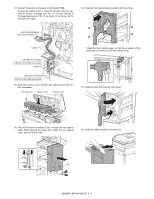
3) Remove two screws which are fixing the paper entry paper guide. 7) Install the paper entry paper guide exclusively used for the MX-FNX2 packed with the saddle finisher. 1 4) Remove the hook (boss) on the upper side of the paper entry paper guide. 2 8) Fix the incoming paper guide using the screws removed in step 2. 5) Remove the hook (boss) on the upper side of the paper entry paper guide with a screwdriver. 9) Replace the dust box to the original position. 6) Remove the paper entry paper guide. 10) Install the punch unit and fix it with the screws. Connect the connector. Boss hole Boss Boss hole Boss Fixing screw Punch unit Fixing screw Fixing screw (M4 x 6 with tooth lock washer) MX3500N AR-PN1A/B/C/D 8 - 3
-
 1
1 -
2
-
3
-
4
-
5
-
6
-
7
-
8
-
9
-
10
-
11
-
12
-
13
-
14
-
15
-
16
-
17
-
18
-
19
-
20
-
21
-
22
-
23
-
24
-
25
-
26
-
27
-
28
-
29
-
30
-
31
-
32
-
33
-
34
-
35
-
36
-
37
-
38
-
39
-
40
-
41
-
42
-
43
-
44
-
45
-
46
-
47
-
 48
48 -
 49
49 -
 50
50 -
 51
51 -
 52
52 -
 53
53 -
 54
54 -
 55
55 -
 56
56 -
 57
57 -
 58
58 -
59
-
60
-
61
-
62
-
63
-
64
-
65
-
66
-
67
-
68
-
69
-
70
-
71
-
72
 |
 |

MX3500N
AR-PN1A/B/C/D
8 – 3
3)
Remove two screws which are fixing the paper entry paper
guide.
4)
Remove the hook (boss) on the upper side of the paper entry
paper guide.
5)
Remove the hook (boss) on the upper side of the paper entry
paper guide with a screwdriver.
6)
Remove the paper entry paper guide.
7)
Install the paper entry paper guide exclusively used for the
MX-FNX2 packed with the saddle finisher.
8)
Fix the incoming paper guide using the screws removed in
step 2.
9)
Replace the dust box to the original position.
10) Install the punch unit and fix it with the screws. Connect the
connector.
1
2
Fixing
screw
Punch unit
Fixing screw
Fixing screw
(M4 x 6 with
tooth lock washer)
Boss
Boss
Boss hole
Boss hole