Sony DPP-FP50 Operating Instructions
Sony DPP-FP50 - Picture Station Digital Photo Printer Manual
 |
UPC - 027242678583
View all Sony DPP-FP50 manuals
Add to My Manuals
Save this manual to your list of manuals |
Sony DPP-FP50 manual content summary:
- Sony DPP-FP50 | Operating Instructions - Page 1
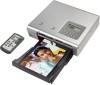
-949-11 (1) Digital Photo Printer DPP-FP50 Before you begin Preparations Making basic printing Printing using the printer's LCD display Making various printing Printing from a PictBridge camera Printing from a PC Troubleshooting Additional information Operating Instructions Before operating this - Sony DPP-FP50 | Operating Instructions - Page 2
or malfunction of the printer or "Memory Stick". Owner's Record The model and serial numbers are located on the bottom. Record the serial number in the space provided below. Refer to these numbers whenever you call upon your Sony dealer regarding this product. Model No. DPP-FP50 Serial No. Disposal - Sony DPP-FP50 | Operating Instructions - Page 3
Trade Name: SONY Model No.: DPP-FP50 Responsible Party: Sony Electronics Inc by accidental operation or malfunction of the printer, we recommend that you save a Windows Ver.2.4 (Copyright © 1998 FUJI PHOTO FILM CO., LTD. All rights reserved)". Exif is the exchangeable image file format for digital - Sony DPP-FP50 | Operating Instructions - Page 4
terms of a separate user license agreement. User Registration To receive customer services, complete and return the registration card included in your package. Any design data such as sample pictures provided in this software cannot be modified or duplicated except for the purpose of personal use - Sony DPP-FP50 | Operating Instructions - Page 5
.......... 39 Making a free layout print 40 Making printer driver 59 Installing the PictureGear Studio 62 Printing photos from the PictureGear Studio 64 Printing from other application software .. 70 Troubleshooting If trouble occurs 71 If an error message appears 86 If paper jams 89 Cleaning - Sony DPP-FP50 | Operating Instructions - Page 6
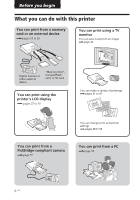
to 20 You can print using a TV monitor You can select and print an image .page 22 Digital Camera or other external device "Memory Stick", CompactFlash card, or SD card You can print using the printer's LCD display .pages 27 to 30 You can make a variety of printings .pages 31 to 47 - Sony DPP-FP50 | Operating Instructions - Page 7
Free layout print (.page 40) Calendar print (.page 44) Card print (.page 45) Split images print (.page 46) Supreme picture quality functions enabling photo quickly. x Paper tray allows you to print up to 20 sheets of paper at one are guaranteed.) x Supplied application software allows you to print - Sony DPP-FP50 | Operating Instructions - Page 8
) CARD insertion slot (pages 19) qk "Memory Stick"/"Memory Stick Duo" insertion slot (page 19) ql SD CARD insertion slot (page 19) w; Memory card slot/Paper tray compartment lid (page 15) wa Print cartridge compartment lid (page 12) ws Print cartridge eject lever (page 12) wd Print - Sony DPP-FP50 | Operating Instructions - Page 9
. And the tray adaptor is not supplied. 2 Paper eject tray (page 13) 3 Paper tray lid (page 13) Remote commander 1 MONITOR OUT button (page 21, 27) 2 INPUT SELECT button (page 21, 27) 3 MENU button (pages 31, 39, 48) 4 EDIT button (page 31) 5 AUTO PRINT button (pages 26, 29) 6 PICTURE button (page - Sony DPP-FP50 | Operating Instructions - Page 10
accessories are supplied with your printer. Paper tray (1) Remote commander (1) The button-type lithium battery has been already installed in the commander. AC adapter AC-S24V1 (1) Clamp filter (1) CD-ROM (1) - Sony DPP-FP50 Printer Driver Software for Windows® XP Professional/Windows® XP Home - Sony DPP-FP50 | Operating Instructions - Page 11
sizebSVM-F40L* • Two packs with each 20 sheets of 3.5 x 5 inch size photo paper • Print cartridge for 40 prints *Note In some regions, 3.5 x 5 inch size print paper is not sold. To order printing packs, visit the following web site: www.sony.com/printers Notes on using printing packs • Always use - Sony DPP-FP50 | Operating Instructions - Page 12
compartment lid. Cartridge error indicator ( ) Notes • Use the print cartridge contained in the same box with the print paper. • Do not touch the ink ribbon or place the print cartridge in a dusty location. Fingerprints or dust on the ink ribbon may result in imperfect printing. Ink ribbon 12 GB - Sony DPP-FP50 | Operating Instructions - Page 13
• Never put your hand into the cartridge compartment. The thermal head reaches high temperatures, especially after repeated printing. 4 Inserting the print paper 1 Open the eject paper tray. • Do not rewind the ink ribbon and use the rewound print cartridge for printing. Otherwise, proper printing - Sony DPP-FP50 | Operating Instructions - Page 14
, align an arrow imprint to the paper feeding direction. Insert the protective sheet together with paper. You can set up to 20 sheets of print paper. Printing surface Tray adaptor To attach the tray adaptor to the tray Put the projections of the tray adaptor into the lock holes of the front of the - Sony DPP-FP50 | Operating Instructions - Page 15
7 Pull and open the printer's paper tray compartment lid. 8 Insert the paper tray into the printer. Insert it firmly until it clicks into place. If print paper runs out during printing, the paper error indicator ( ) appears on the LCD display of the printer. Remove the paper tray and feed the print - Sony DPP-FP50 | Operating Instructions - Page 16
5 Preparing the remote commander 1 Remove the insulation sheet from the remote commander. With the insulation sheet removed from the lithium battery, the remote commander is ready for use. Replacing batteries When the printer does not respond to the remote commander, the battery may run out. 1 Push - Sony DPP-FP50 | Operating Instructions - Page 17
has been turned off. • The print paper emerges from the paper outlet a few times during printing. Do not block the paper outlet with the AC adapter or AC power cord. Using your printer abroad You can use your printer in any country or region with the AC adapter (supplied) within 100 V to 240 V AC - Sony DPP-FP50 | Operating Instructions - Page 18
, unplug the AC power cord of the printer and turn off a TV monitor. • When you do not use the supplied video connecting cable, use a commercially available video connecting cable shorter than 3 m. • When you use the LCD display or connect the printer to a PictBridge-compliant digital camera or PC - Sony DPP-FP50 | Operating Instructions - Page 19
Note If the eject button is projected, you cannot close the tray compartment lid properly. Please make sure that the eject button is not the SD CARD slot until it fits into place. Access indicator flashes while the printer is accessing the memory card. Insert it in the b mark direction. To - Sony DPP-FP50 | Operating Instructions - Page 20
, see the operating instructions of the external device. (In case of Sony Cyber-shot digital camera, for example, select "Normal" mode for the "USB Connect". ) 2 Connect a camera or an external device to the PictBridge/CAMERA connector of the printer. Use the USB connecting cable supplied with the - Sony DPP-FP50 | Operating Instructions - Page 21
on the upper left of the TV monitor. (When no external device is connected, "External Device" will not be displayed.) Access indicator flashes while the printer is accessing the memory card. The list of the images on the selected media are displayed on the TV monitor (image list). Continued 21 GB - Sony DPP-FP50 | Operating Instructions - Page 22
/DPOF/ Protect indications* Print cartridge type (P: Postcard/L: 3.5 x 5 inch/C: cleaning cassette) * Associated file/DPOF indication: The image is DPOF preset with a digital camera. • Protect indication: The image is protected with a digital camera. To display another page When multiple pages - Sony DPP-FP50 | Operating Instructions - Page 23
TV monitor. • Never move or turn off the printer while it is printing; the print cartridge or paper may become stuck. In case you turn off the power, keep the paper tray inserted and then turn on the printer. If paper being printed remains in the printer, remove it and resume printing from the step - Sony DPP-FP50 | Operating Instructions - Page 24
printed. To print multiple images at a time, print them in the image list. To display the image list again Press PICTURE. Note The displayed picture on a TV monitor is not identical with the printed picture because phosphor methods or profiles of each TV monitor differ. Please regard the displayed - Sony DPP-FP50 | Operating Instructions - Page 25
automatically emerges, remove the printed paper from the paper tray. Making AUTO printing (INDEX/DPOF/ALL) AUTO (automatic) printing allows you to print multiple images stored on a memory card or an external device at one time. The printer provides the following three AUTO printing methods: • INDEX - Sony DPP-FP50 | Operating Instructions - Page 26
Notes • For how to preset images for printing, see the manual of your digital camera. • Some types of digital camera do not support the DPOF function, or the printer may not support some of the functions of the digital camera. Using the remote commander 2 1 1 Press AUTO PRINT repeatedly to display " - Sony DPP-FP50 | Operating Instructions - Page 27
, "External Device" will not be displayed.) Access indicator flashes while the printer is accessing the memory card. The main menu appears. Selected input media (Memory card or external device) Print cartridge type (P: Postcard/L: 3.5 x 5 inch) If "Selected" is not selected for the "Print - Sony DPP-FP50 | Operating Instructions - Page 28
device are displayed. Image number Print quantity Tip You can display the "Select Image" window by pressing G in step 2-2. 4 Press f/F to select the image number of is complete and the print paper automatically emerges, remove the printed paper from the paper tray. For the notes during printing, see page - Sony DPP-FP50 | Operating Instructions - Page 29
time. The printer provides the DPOF preset images of a digital camera. • ALL images paper automatically emerges, remove the printed paper from the paper tray cartridge or print paper runs out in the middle of printing, you can continue printing by replacing the print cartridge or inserting print paper - Sony DPP-FP50 | Operating Instructions - Page 30
adjustment for printing. (Photo*/Vivid/Off) Exif Print You can turn on or off the automatic adjustments of the images shot by an Exif Print (Exif 2.21)compliant digital camera to its optimum picture quality. (On*/ Off) Borders You can select border or borderless prints. (Yes/No*) Date Print - Sony DPP-FP50 | Operating Instructions - Page 31
in the Edit menu To exit the menu mode Press MENU again. The previous window is displayed. 3 Press g/G to select (Edit) and then press ENTER. The Select the image in the image list or press PICTURE to display its preview image. 2 Press MENU on the printer or EDIT on the remote commander. The menu - Sony DPP-FP50 | Operating Instructions - Page 32
Edit menu (page 31). 2 Press g/G/f/F to select (Rotate) and then press ENTER. The Rotate menu is displayed. Rotate menu Rotate tool Note The picture quality of an enlarged image may be deteriorated depending on its size. Moving an image 1 Display the Edit menu (page 31). 2 Press g/G/f/F to select - Sony DPP-FP50 | Operating Instructions - Page 33
like an old photograph with faded colors. • Monochrome: Changes the image into a monochrome picture. • Paint: Makes the image look like a painted picture. • Fish-eye: Makes the image look like a photo taken with a fish-eye lens. • Clear Filter: Removes the filter from the image. Continued - Sony DPP-FP50 | Operating Instructions - Page 34
red- eye reduction adjustment. The adjustment takes place. To reset the adjustment Press CANCEL in step 5. The red-eye reduction is canceled and the window of step 2 is displayed. 3 Adjust the position and size of the adjustment frame. Make the red-eye reduction adjustment for the right and left - Sony DPP-FP50 | Operating Instructions - Page 35
displayed next to "COLOR". To apply different color, do the following: 1 Press g/G/f/F to select "COLOR" and press ENTER. The color selection window is displayed. Making various printing (MONITOR OUT mode) Select color and font, and load/ save the messages. Select a character. 3 Select a font - Sony DPP-FP50 | Operating Instructions - Page 36
you press ENTER, a character before the cursor is deleted. • To insert a character among the input characters Press g/G/f/F to select "B" or "b" on the window and then press ENTER repeatedly until the cursor (|) moves to the position where you want to insert a character. 6 After you finish entering - Sony DPP-FP50 | Operating Instructions - Page 37
ENTER. The dialog box to register and save messages is displayed. To load a registered message In step 3 above, select "Load" to display the window used for selecting a message. Press f/F to select the desired message and press ENTER. The selected message is placed in the character input box. Note - Sony DPP-FP50 | Operating Instructions - Page 38
finish editing or making creative print or you select "Save" in the window, the dialog box to select the media to save the image in ENTER. Note While saving the image, do not turn off the printer or remove a memory card from the printer. The memory card may be damaged. Printing an image 1 Press - Sony DPP-FP50 | Operating Instructions - Page 39
CANCEL PRINT CREATIVE PRINT PRINT g/G/f/F/ENTER CANCEL 1 Press MENU on the printer or CREATIVE PRINT on the remote commander. The menu bar is displayed (Page 38). To undo and redo the operation midway Press CANCEL. The window of the previous step is displayed. Depending on the step, you cannot undo - Sony DPP-FP50 | Operating Instructions - Page 40
add an image, wallpaper, a message, characters, a calendar, or stamps to make an original free layout print. If you do not want to place wallpaper on the image, select "No Wallpaper". The preview window of the selected wallpaper is displayed. Selected wallpaper 1 Display the Creative Print menu - Sony DPP-FP50 | Operating Instructions - Page 41
tools 9 Press g/G/f/F to select "Execute" and press ENTER. The window used for adjusting the framed image size and position is displayed. 10 Execute" and press ENTER. The framed image is displayed. Using the items in this window, you can add your favorite effects on the print (pages 42 to 43). Items - Sony DPP-FP50 | Operating Instructions - Page 42
is pasted on the image. x Changing the wallpaper To change the wallpaper, press g/G/f/F to select (Wallpaper) and press ENTER. The wallpaper election window is displayed. Follow the step 4 on page 40. 2 Press g/G/f/F to select the desired message, then press ENTER. The character color selection - Sony DPP-FP50 | Operating Instructions - Page 43
and then f/F to select the desired color for Sunday and Saturday. Then press ENTER. 4 Press g/G/f/F to select "Execute" and then press ENTER. The window used for adjusting the calendar size and position is displayed. 5 Adjust the size and position of the calendar. For information on adjustment, see - Sony DPP-FP50 | Operating Instructions - Page 44
image is selected and displayed in the relevant area. 6 Set the calendar. Press g/G/f/F to select the calendar area and press ENTER to display calendar setting window. Set the calendar in the same way as in step 3 on page 43. 7 Press g/G/f/F to select "Execute" and then press ENTER. The calendar is - Sony DPP-FP50 | Operating Instructions - Page 45
select the image area, then press ENTER. The image list is displayed (page 41). 2 Press g/G/f/F to select the desired image, then press ENTER. The window used for adjusting the image size and position is displayed. 3 Adjust the size and position of the image. For information on adjustment, see step - Sony DPP-FP50 | Operating Instructions - Page 46
the "Postcard size".) 1 Display the Creative Print menu (page 39). 2 Press g/G/f/F to select "Split Image", then press ENTER. The print size selection window is displayed (page 40). 3 Press g/G to select the print size, then press ENTER. The split image templates are displayed. 9 Check the preview - Sony DPP-FP50 | Operating Instructions - Page 47
for selecting an image is displayed (page 41). 6 Press g/G/f/F to select the desired image, and then press ENTER. The window used for adjusting the image position is displayed. 7 Adjust the size and position of the image. For information on adjustment, see step 8 on page 41. - Sony DPP-FP50 | Operating Instructions - Page 48
. Then press ENTER. 1 Press MENU. The menu bar is displayed. Set Up menu icon Menu bar To exit the menu mode Press MENU. The previous window is displayed. 48 GB - Sony DPP-FP50 | Operating Instructions - Page 49
with the printer driver has priority over the setting here. In the LCD and PictBridge modes, this setting holds effective. Off Prints an image without any corrections. Exif Print On* Adjusts an image shot by an Exif Print (Exif 2.21)compliant digital camera to its optimum picture quality. Note - Sony DPP-FP50 | Operating Instructions - Page 50
an image in the DCF file format. When the image is saved with the printer, the date of saving is printed. OFF* Prints an image without the date. level, the more greenish the picture becomes as if it receives green light. The lower you set the level, the darker the picture becomes as if red purple - Sony DPP-FP50 | Operating Instructions - Page 51
press ENTER. • When "Automatic" is selected: The images in the memory card or an external device are displayed automatically one after another. • When "Manual" is selected: The image with the cursor in the image list is displayed. To switch images, press g/G/f/F. The image to the left, right, above - Sony DPP-FP50 | Operating Instructions - Page 52
Delete/Format menu icon To exit the menu mode Press MENU. The previous window is displayed. 2 Press g/G to select (Delete/ Format) and then press • During deleting or formatting, do not turn off the printer or remove the memory card The printer or the memory card or external device may be damaged. - Sony DPP-FP50 | Operating Instructions - Page 53
deleted. g/G/f/F/ENTER CANCEL 1 Press MENU. The menu bar is displayed. Menu bar Image Search menu icon To exit the menu mode Press MENU. The previous window is displayed. Continued 53 GB - Sony DPP-FP50 | Operating Instructions - Page 54
2 Press g/G to select (Image Search) and then press ENTER. The Image Search menu is displayed. Cursor Image Search menu • When you select "By Date": Specify the starting and ending dates of the files that you want to search for: Starting date Ending date 3 Press f/F to select the search key and - Sony DPP-FP50 | Operating Instructions - Page 55
Changing the printer preferences (Option) The Option menu allows you to change the preferences listed on page 56. Buttons to be used in this gray and cannot be selected. Making various printing (MONITOR OUT mode) To exit the menu mode Press MENU. The previous window is displayed. Continued 55 GB - Sony DPP-FP50 | Operating Instructions - Page 56
) data will be displayed as its original image. Image data display On In the image list window, image information (file type, shooting conditions, etc.) will be displayed. Off* In the image list window, no image information will be displayed. Language You can select the language of menu or - Sony DPP-FP50 | Operating Instructions - Page 57
For details, see the operating instructions of the digital camera you use. (In case of Sony Cyber-shot digital camera, for example, select "PictBridge" mode for the "USB Connect". ) Note When you use a DSC-T1, you need to update software version. 2 Connect the printer to the AC power source (page 17 - Sony DPP-FP50 | Operating Instructions - Page 58
operating instructions of your PC. Installation of the software is necessary only when you connect the printer to your PC for the first time. On the supplied CD-ROM The supplied CD-ROM contains the following software: • Printer driver for DPP-FP50: The software describes the printer's requirements - Sony DPP-FP50 | Operating Instructions - Page 59
should use may differ depending on the computer. For details, see the instructions manual of your computer. Installing the printer driver 1 Make sure that the printer is disconnected from the computer. Note If you connect the printer to your PC in this stage, either of the following dialog boxes - Sony DPP-FP50 | Operating Instructions - Page 60
CD-ROM. 4 Click "Installing Printer Driver". 8 Connect the printer to the AC power source (page 17). 9 Press ON/STANDBY to turn on the printer (page 17). The ON/STANDBY indicator of the printer lights in green. 10 Click "Next". The "Sony DPP-FP50 InstallShieldWizard" dialog box appears. 5 Click - Sony DPP-FP50 | Operating Instructions - Page 61
the USB cable from your printer and the computer. 2 Insert the supplied CD-ROM into the CD-ROM drive of your computer. The setup starts automatically and the installation window is displayed. 3 Click "Installing Printer Driver". The "Sony DPP-FP50 - InstallShield Wizard" dialog box appears - Sony DPP-FP50 | Operating Instructions - Page 62
the "DPPFP50" is displayed. If not, the printer driver is successfully removed. Installing the PictureGear Studio 1 Turn on your computer and start Windows. • When installing or uninstalling the software in Windows® 2000 Professional, log on Windows as the user name of "Administrator" or "Power user - Sony DPP-FP50 | Operating Instructions - Page 63
device or medium storing photos when the PictureGear Studio is installed in an operating system other than the Windows XP. To change • The PictureGear Studio supplied with the DPP-FP50 has the following limitations: - In PhotoCollection, you cannot select paper other than "Sony". - In PrintStudio, - Sony DPP-FP50 | Operating Instructions - Page 64
"Setup.exe" in the "pgs.add" folder. Uninstalling the PictureGear Studio When the software becomes unnecessary, remove it from your PC hard disk as follows: 1 Remove the USB cable between the printer and the PC. 2 Insert the supplied CD-ROM into the CD-ROM drive of your computer. The setup starts - Sony DPP-FP50 | Operating Instructions - Page 65
results. • When you use the supplied printing pack, select "DPP-F series 4 x 6" SVMF40P. When you select the paper size, the print dialog box is displayed. 7 In the "Printer" drop-down list box, select "Sony DPP-FP50" and then click "Properties". In the "Printer" drop-down list box, select the - Sony DPP-FP50 | Operating Instructions - Page 66
Items Functions Print All All the photos selected in the "Select Photo" window will be printed. Print the selected page only The image being displayed in the "Print Preview" will be printed. Printer Select "Sony DPP-FP50". Border Free Print • When checked, an image will be printed without margins - Sony DPP-FP50 | Operating Instructions - Page 67
of copies to be printed. Note Depending on the application software you use, the print quantity setting of the application has the "Graphics" tab, set the color reproduction and picture quality. Items Functions Color reproduction/Picture quality Select the setting from the dropdown list box: - Sony DPP-FP50 | Operating Instructions - Page 68
. When printing from the application software that does not support the ICM system, an image may be printed with incorrect colors. Exif Print Check it to adjust and print an image shot with a Exif Print (Exif 2.21)-compliant digital camera. The printer driver uses the color conversion and Exif - Sony DPP-FP50 | Operating Instructions - Page 69
preview" is checked in step 8 The preview window is displayed. Check the adjustment results and then click "Print". Notes • Never move or turn off the printer while it is printing; the print cartridge or paper may become stuck. If this happens, turn the printer off and then on, and resume printing - Sony DPP-FP50 | Operating Instructions - Page 70
even if you select borderless print in the "Paper size" section of the "Paper/Output" tab in the "Sony DPP-FP50 Properties" dialog box. When you select the borderless print option, the printing rage information for borderless print will be supplied to the application. Some applications, however, may - Sony DPP-FP50 | Operating Instructions - Page 71
Troubleshooting If trouble occurs If you run into any problems using the printer, use the following guidelines to solve the problem. If the problem persists, consult your Sony dealer. Power Symptom Check The ON/ • Is the AC power cord SYANDBY properly connected? button cannot be turned on - Sony DPP-FP50 | Operating Instructions - Page 72
DCF (Design rule for Camera File system), it may not be printed with the printer even if it is displayed on the PC monitor. • Does the mark displayed computer, or the thumbnail data is not contained. Select the mark and press PICTURE. If a preview image is displayed, you can print the image. If the - Sony DPP-FP50 | Operating Instructions - Page 73
, the file name may not be displayed correctly or the image may not be displayed on the printer (read error). • Did you specify the print quantity in the image list? c Once you have selected images , the first 8 characters of its file name will be displayed as the file name. Troubleshooting 73 GB - Sony DPP-FP50 | Operating Instructions - Page 74
of an image shot with a digital camera is 3:4. When an image paper properly c If print paper is not properly loaded, set in the paper tray? the printer may develop trouble. Check the following: • Is the correct set of print paper and print cartridge loaded? (.page 11) • Does the print paper - Sony DPP-FP50 | Operating Instructions - Page 75
printer cannot feed the print paper, the / (paper/cartridge error) indicators flash and an error message is displayed in the MONITOR OUT mode. Remove the paper tray and check paper jam. (.page 89) c The print paper size setting of the digital camera you are using. Troubleshooting • Did you use - Sony DPP-FP50 | Operating Instructions - Page 76
, a highly-compressed JPEG file may be also recorded. As the printer does not support the RAW file format, it may use the JPEG file to print an image. A RAW file can be printed from a PC. For details, see the operating instructions of the digital camera you are using. What is a RAW file? A RAW file - Sony DPP-FP50 | Operating Instructions - Page 77
on the screen as just a reference. To adjust picture quality, do either of the following: - Menu - Set Up - Color Setting (.page 50) - Menu-Edit-Adjust (.page 33) c Because of the differences in the printer's internal processing and PC software processing, the printed images will be different. c Set - Sony DPP-FP50 | Operating Instructions - Page 78
camera. This is not because of trouble with the printer, but because the image was rewritten with your digital camera. There are white lines or dots on the printed pictures. c The print head or paper path may be soiled. Use the supplied cleaning cartridge to clean the head and path. (.page 89 - Sony DPP-FP50 | Operating Instructions - Page 79
Symptom Check The picture is too bright, dark, reddish, yellowish, or greenish. The eyes of the subject are red. Red-eye reduction does not Print menu? Cause/Solutions c In the Creative Print menu, templates are used and you cannot select border/borderless prints. Troubleshooting 79 GB - Sony DPP-FP50 | Operating Instructions - Page 80
images (.page 52), or replace it with a new memory card with sufficient free memory space. Save the image again. You cannot • Is the memory card • Is the image DPOF-preset? c Release the DPOF preset with your digital camera. • Is the write-protect switch c Slide the write-protect switch - Sony DPP-FP50 | Operating Instructions - Page 81
• Are the / (paper/ cartridge error) indicators flashing? c Paper is jammed. See "If paper jams" (.page 89) and remove jammed paper from the printer. If jammed paper cannot be removed, contact the Sony service facilities. • Is any indicator lit? c If no indicator is lit, the thermal head may be - Sony DPP-FP50 | Operating Instructions - Page 82
an overcurrent error. Unplug the AC power cord of the printer, plug it in again, and then press the ON/STANDBY button to recover from the error. I cannot stop printing even if I pressed CANCEL. c The next print from the one currently printed will be canceled. c Depending on the digital camera you - Sony DPP-FP50 | Operating Instructions - Page 83
or an external device images from the printer. c Please download the printer driver from the Customer support home page (.page 96). Or contact your Sony dealer. c Follow the procedures in the operating instructions to install the driver (.page 59). If an error occurs, restart your computer and do - Sony DPP-FP50 | Operating Instructions - Page 84
. If the printer shows trouble, do the following: - Turn off the ON/STANDBY button and then turn it on again. - Disconnect the power cable, wait for 5 to 10 seconds, and then connect the cable again. - Restart your computer. If these do not solve the problem, consult with your Sony dealer or service - Sony DPP-FP50 | Operating Instructions - Page 85
"Sony DPP-FP50 Properties" dialog box? c The ICM setting may be valid only when you are using an ICM-compliant application. Check to see if the application software you are using supports ICM. Preview image does not reflect the print settings in the "Graphics" tab of the "Sony DPPFP50 Properties - Sony DPP-FP50 | Operating Instructions - Page 86
problem. Printer Error messages Errors occurs with Printer. Turn off and on then retry. Meaning/Solutions c An error has occurred with the printer. Unplug the AC power cord of the printer, connect it again and then try operating again. If this occurs again, consult with your Sony dealer or Sony - Sony DPP-FP50 | Operating Instructions - Page 87
c The print cartridge is not inserted in the printer. Set the print cartridge into the printer. (.page 13) If "for ### size" (###: Postcard, 3.5 x 5 inch) appears, set a print cartridge of the specified size. If "cleaning" is displayed, set the cleaning cartridge. (.page 89) Troubleshooting 87 GB - Sony DPP-FP50 | Operating Instructions - Page 88
of the specified size into the tray and set the paper tray into the printer. (.page 13) c There is no cleaning sheet in the paper tray. Insert cleaning sheet into the paper tray and set the paper tray into the printer. (.page 13) c The print paper and print cartridge do not match. Check the print - Sony DPP-FP50 | Operating Instructions - Page 89
/ cartridge error) indicators flash and printing stops. Unplug the AC power cord of the printer and remove the jammed paper from the paper outlet or take out the paper tray to remove the jammed paper. Pull out the jammed paper slowly. Take out the paper tray to remove the jammed paper. Cleaning the - Sony DPP-FP50 | Operating Instructions - Page 90
imprints 6 Set the paper tray into the printer and press PRINT. The cleaning cartridge and protective sheet will clean inside the printer. After the cleaning is finished, the protective sheet is automatically ejected. 7 Remove the cleaning cartridge and protective sheet from the printer. Tips • Keep - Sony DPP-FP50 | Operating Instructions - Page 91
if you persist in using it. If moisture condensation occurs, unplug the AC power cord of the printer and do not use the printer for at least one hour. On transport When you transport the printer, remove the print cartridge, paper tray, AC adapter, the memory card, or an external device from the - Sony DPP-FP50 | Operating Instructions - Page 92
"Memory Stick" (MagicGate/HighSpeed Transfer Compatible) employs "MagicGate" copyright protection technology and supports high-speed data transfer. It can be used with all the "Memory Stick"-compatible to insert it in a wrong direction, the "Memory Stick Duo" and the printer may be damaged. 92 GB - Sony DPP-FP50 | Operating Instructions - Page 93
technology. The "MagicGate"-compliant device and the "MagicGate Memory Stick" attest that each other supports the "MagicGate" technology and encode the data they exchange. The printer does not support the "MagicGate" standards and cannot read or write the data subject to the "MagicGate" copyright - Sony DPP-FP50 | Operating Instructions - Page 94
Stick", use the format function of the printer or your digital camera. If you format a "Memory Stick picture card or smart media by using a commercially available CompactFlash card adaptor. Not all the memory card operations are supported. Notes on use • You cannot use CompactFlash cards with a power - Sony DPP-FP50 | Operating Instructions - Page 95
Picture Card, or Smart Media card, use a commercially available CompactFlash card adaptor that is compatible with the card. Insert the card into the adaptor and then insert it into the printer. For how to install the card and adaptor, refer to the operating instructions time (per sheet) Post Card - Sony DPP-FP50 | Operating Instructions - Page 96
Creative Print) Maximum number of files to be handled 9 999 files for a memory card/an external device Print cartridge/Print Paper See "Preparing the printing pack (not supplied)" on page 11 Power requirements DC IN jack, DC 24V (On standby mode, less than 1W) Operating temperature 5 ˚C to 35 ˚C (41 - Sony DPP-FP50 | Operating Instructions - Page 97
those when an image with a 2:3 aspect ratio is printed. The printing range differs for a border or a borderless print. Note In some regions, 3.5 x 5 inch size print paper is not sold. 97 GB Additional information - Sony DPP-FP50 | Operating Instructions - Page 98
digital cameras) Print is a global standard for digital photo printing. A digital camera supporting Exif Print stores the data relevant to the conditions of shooting as each shot is taken. The printer 21)-compliant digital camera, the image is automatically adjusted to its optimum picture quality and - Sony DPP-FP50 | Operating Instructions - Page 99
/reduce 32, 67 Error messages 86 Exif Print 49, 66, 68, 98 F Features 7 Filter 33 Finish 49 Formatting "Memory Stick" 53 Frame 40 Free layout print 40 I ICM 68 Image information 56 Image list 22 INDEX 25, 29 INPUT SELECT 21, 27 Installing Picture Gear Studio 62 Printer driver 59 System requirements - Sony DPP-FP50 | Operating Instructions - Page 100
characters 35 Supplied accessories 10 System requirements 58 T Thumbnails 56, 72, 98 Transport 91 Tray adaptor 13 Troubleshooting 71 U Undoing the operations 39 Uninstalling Picture Gear Studio 64 Printer driver 61 USB connector 60 V VIDEO OUT connector 18 W Wallpaper 40 Sony Corporation Printed
-
 1
1 -
 2
2 -
 3
3 -
 4
4 -
 5
5 -
 6
6 -
 7
7 -
8
-
9
-
10
-
11
-
12
-
13
-
14
-
15
-
16
-
17
-
18
-
19
-
20
-
21
-
22
-
23
-
24
-
25
-
26
-
27
-
28
-
29
-
30
-
31
-
32
-
33
-
34
-
35
-
36
-
37
-
38
-
39
-
40
-
41
-
42
-
43
-
44
-
45
-
46
-
47
-
48
-
49
-
50
-
51
-
52
-
53
-
54
-
55
-
56
-
57
-
58
-
59
-
60
-
61
-
62
-
63
-
64
-
65
-
66
-
67
-
68
-
69
-
70
-
71
-
72
-
73
-
74
-
75
-
76
-
77
-
78
-
79
-
80
-
81
-
82
-
83
-
84
-
85
-
86
-
87
-
88
-
89
-
90
-
91
-
92
-
93
-
94
-
95
-
96
-
97
-
98
-
99
-
100
 |
 |

2-599-949-
11
(1)
2005 Sony Corporation
Operating Instructions
Before operating this printer, please read
this manual thoroughly and retain it for
future reference.
Digital Photo
Printer
DPP-FP50
Before you begin
Preparations
Making basic printing
Printing using the printer's
LCD display
Making various printing
Printing from a PictBridge
camera
Printing from a PC
Troubleshooting
Additional information