Sony DPP-FP50 Operating Instructions - Page 82
Connecting with a digital camera - power cord
 |
UPC - 027242678583
View all Sony DPP-FP50 manuals
Add to My Manuals
Save this manual to your list of manuals |
Page 82 highlights
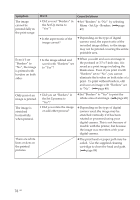
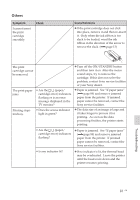
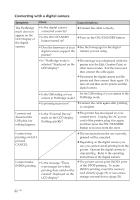
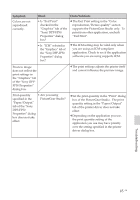
Connecting with a digital camera Symptom The PictBridge mark does not appear on the LCD display of the digital camera. Check • Is the digital camera connected correctly? • Is the ON/STANDBY button turned on? Cause/Solutions c Connect the cable correctly. c Turn on the ON/STANDBY button. • Does the firmware of your c See the homepage for the digital digital camera support the camera you are using. printer? • Is "PictBridge mode is selected "displayed on the LCD display? c The message is not displayed while the printer is in the Edit, Creative Print, or other menu modes. Exit the menu and then connect the cable again. c Disconnect the digital camera and the printer and then connect them again. Or turn off and then on the printer and the digital camera. • Is the USB setting of your Set the USB setting of your camera to the camera in PictBridge mode? PictBridge mode. • Is printing in process? c Connect the cable again after printing is complete. I connect and disconnect the USB cable, but nothing happens. • Is the "External Device" mark on the LCD display flashing quickly? c The printer has developed an overcurrent error. Unplug the AC power cord of the printer, plug it in again, and then press the ON/STANDBY button to recover from the error. I cannot stop printing even if I pressed CANCEL. c The next print from the one currently printed will be canceled. c Depending on the digital camera you use, you cannot cancel printing from the printer. Operate the digital camera to stop printing. Refer to the operating instructions of the digital camera. I cannot make INDEX printing. • Is the message "There were images for which printing data could not be created" displayed on the LCD display? c The printer cannot print INDEX print of the DPOF printing. To make INDEX printing, insert the memory card directly (page 19) or use a mass storage external device (page 20). 82 GB
-
 1
1 -
2
-
3
-
4
-
5
-
6
-
7
-
8
-
9
-
10
-
11
-
12
-
13
-
14
-
15
-
16
-
17
-
18
-
19
-
20
-
21
-
22
-
23
-
24
-
25
-
26
-
27
-
28
-
29
-
30
-
31
-
32
-
33
-
34
-
35
-
36
-
37
-
38
-
39
-
40
-
41
-
42
-
43
-
44
-
45
-
46
-
47
-
48
-
49
-
50
-
51
-
52
-
53
-
54
-
55
-
56
-
57
-
58
-
59
-
60
-
61
-
62
-
63
-
64
-
65
-
66
-
67
-
68
-
69
-
70
-
71
-
72
-
73
-
74
-
75
-
76
-
 77
77 -
 78
78 -
 79
79 -
 80
80 -
 81
81 -
 82
82 -
 83
83 -
 84
84 -
 85
85 -
 86
86 -
 87
87 -
88
-
89
-
90
-
91
-
92
-
93
-
94
-
95
-
96
-
97
-
98
-
99
-
100
 |
 |
