Sony DPP-FP50 Operating Instructions - Page 41
Items, Procedures
 |
UPC - 027242678583
View all Sony DPP-FP50 manuals
Add to My Manuals
Save this manual to your list of manuals |
Page 41 highlights
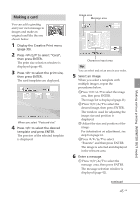
7 Press g/G/f/F to select the desired image, then press ENTER. The window used for adjusting the image size and position is displayed. Adjustment tools 9 Press g/G/f/F to select "Execute" and press ENTER. The window used for adjusting the framed image size and position is displayed. 10 Adjust the size and position of the framed image. For information on adjustment, see step 8. 11 Press g/G/f/F to select "Execute" and press ENTER. The framed image is displayed. Using the items in this window, you can add your favorite effects on the print (pages 42 to 43). Items you can add to the print Preview of the created print Making various printing (MONITOR OUT mode) 8 Press g/G/f/F to select the desired adjustment tool, then press ENTER. Items Procedures Each time you press ENTER, the image becomes larger. Each time you press ENTER, the image becomes smaller. Move the adjustment frame with g/G/f/F, and then press ENTER. Each time you press ENTER, the image rotates 90° clockwise. Each time you press ENTER, the image rotates 90° counterclockwise. 12 Check the preview, then save and print your Creative print. For saving and printing an image, see page 38. 41 GB
-
 1
1 -
2
-
3
-
4
-
5
-
6
-
7
-
8
-
9
-
10
-
11
-
12
-
13
-
14
-
15
-
16
-
17
-
18
-
19
-
20
-
21
-
22
-
23
-
24
-
25
-
26
-
27
-
28
-
29
-
30
-
31
-
32
-
33
-
34
-
35
-
 36
36 -
 37
37 -
 38
38 -
 39
39 -
 40
40 -
 41
41 -
 42
42 -
 43
43 -
 44
44 -
 45
45 -
 46
46 -
47
-
48
-
49
-
50
-
51
-
52
-
53
-
54
-
55
-
56
-
57
-
58
-
59
-
60
-
61
-
62
-
63
-
64
-
65
-
66
-
67
-
68
-
69
-
70
-
71
-
72
-
73
-
74
-
75
-
76
-
77
-
78
-
79
-
80
-
81
-
82
-
83
-
84
-
85
-
86
-
87
-
88
-
89
-
90
-
91
-
92
-
93
-
94
-
95
-
96
-
97
-
98
-
99
-
100
 |
 |
