Sony VGX-XL1 User Guide - Page 124
Restore Complete System, Go to Restore C: Drive, Keep the Recovery Drive, I understand
 |
View all Sony VGX-XL1 manuals
Add to My Manuals
Save this manual to your list of manuals |
Page 124 highlights
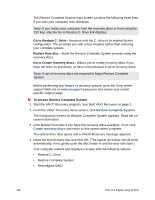
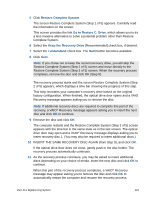
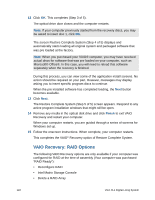
5 Click Restore Complete System. The screen Restore Complete System (Step 1 of 5) appears. Carefully read the information on the screen. This screen provides the link Go to Restore C: Drive, which allows you to try a less invasive alternative to solve a potential problem other than Restore Complete System. 6 Select the Keep the Recovery Drive [Recommended] check box, if desired. 7 Select the I understand check box. The Next button becomes available. 8 Click Next. Note: If you chose not to keep the current recovery drive, you will skip the Restore Complete System (Step 2 of 5) screen and move directly to the Restore Complete System (Step 3 of 5) screen. When the recovery process completes, remove the disc and click OK (Step 9). The recovery process starts and the screen Restore Complete System (Step 2 of 5) appears, which displays a time bar showing the progress of this step. This step recreates your computer's recovery drive based on the original factory configuration. When finished, the optical drive door opens and a VAIO Recovery message appears asking you to remove the disc. Note: If additional recovery discs are required to complete this part of the recovery, a VAIO® Recovery message appears asking you to insert the next disc and click OK to continue. 9 Remove the disc and click OK. The computer restarts and the Restore Complete System (Step 3 of 5) screen appears with the time bar in the same state as in the last screen. The optical drive door may open and a VAIO® Recovery message displays asking you to insert recovery disc 1. (You may also be required to insert additional discs.) 10 INSERT THE SAME RECOVERY DISC AGAIN (from Step 9), and click OK. If the optical drive door does not close, gently push in the disc holder. The recovery process automatically continues. 11 As the recovery process continues, you may be asked to insert additional discs depending on your choice of media. Insert the next disc and click OK to continue. When this part of the recovery process completes, a VAIO® Recovery message may appear asking you to remove the disc and click OK to automatically restart the computer and resume the recovery process. VGX-XL1 Digital Living System 121
-
 1
1 -
2
-
3
-
4
-
5
-
6
-
7
-
8
-
9
-
10
-
11
-
12
-
13
-
14
-
15
-
16
-
17
-
18
-
19
-
20
-
21
-
22
-
23
-
24
-
25
-
26
-
27
-
28
-
29
-
30
-
31
-
32
-
33
-
34
-
35
-
36
-
37
-
38
-
39
-
40
-
41
-
42
-
43
-
44
-
45
-
46
-
47
-
48
-
49
-
50
-
51
-
52
-
53
-
54
-
55
-
56
-
57
-
58
-
59
-
60
-
61
-
62
-
63
-
64
-
65
-
66
-
67
-
68
-
69
-
70
-
71
-
72
-
73
-
74
-
75
-
76
-
77
-
78
-
79
-
80
-
81
-
82
-
83
-
84
-
85
-
86
-
87
-
88
-
89
-
90
-
91
-
92
-
93
-
94
-
95
-
96
-
97
-
98
-
99
-
100
-
101
-
102
-
103
-
104
-
105
-
106
-
107
-
108
-
109
-
110
-
111
-
112
-
113
-
114
-
115
-
116
-
117
-
118
-
 119
119 -
 120
120 -
 121
121 -
 122
122 -
 123
123 -
 124
124 -
 125
125 -
 126
126 -
 127
127 -
 128
128 -
 129
129 -
130
-
131
-
132
-
133
-
134
-
135
-
136
-
137
-
138
-
139
-
140
-
141
-
142
-
143
-
144
-
145
-
146
-
147
-
148
-
149
-
150
-
151
-
152
-
153
-
154
-
155
-
156
-
157
-
158
-
159
-
160
-
161
-
162
-
163
-
164
-
165
-
166
-
167
-
168
-
169
-
170
-
171
-
172
-
173
-
174
-
175
 |
 |