Sony VGX-XL1 User Guide - Page 74
Assign Drive Letter or Path, Assign a Drive Letter
 |
View all Sony VGX-XL1 manuals
Add to My Manuals
Save this manual to your list of manuals |
Page 74 highlights
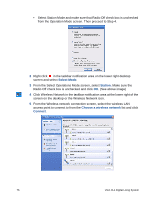
11 Enter the size of the partition you want to create in the Partition Size field and click Next. The Partition Creation Completion screen is displays. 12 Click Complete. The Partition Creation Completion screen closes and the hard disk display now shows the partition has changed from Not Assigned to Open Space. 13 Right click on the Open Space area and click Create New Logical Drive. The Create New Partition screen displays. 14 Click Next. The Select Partition Type screen is displays. 15 Select the Logic Drive and click Next. The Specify Partition Size screen is displays. 16 Enter the size of the partition you want to create in the Partition Size field and click Next. The Assign Drive Letter or Path screen is displays. 17 Select Assign a Drive Letter and click Next. The Partition Format screen displays. 18 Set the options in Format as follows: • File system to use: NTFS • Allocation size: Default • Volume label: Volume 19 When complete, click Next. The New Partition Completion screen is displays. Click Complete. Notes Formatting of the hard disk to set up the partition begins. The status of the partition is displays in the right side of the window. When the formatting is complete, the upgraded hard disk is ready to use. RAID configuration can be changed after upgrading the hard disk. Refer to "Recovery After Changing the RAID Configuration" for details. Click on the [Start] button and move your pointer to [All Programs], click on [VAIO Setting], set "Never" for "Turn Off The Power For Hard Disk" in the "Power Option Property" screen displayed by double clicking [Power/Battery] [Power Option] in this order. If it is set to other than "Never", recording using the Do VAIO may fail. When a RAID volume and a drive not configured as a RAID (volume) are mixed in the system, Windows may not run. Refer to "Windows doesn't start" in "Troubleshooting" regarding this case. VGX-XL1 Digital Living System 71
-
 1
1 -
2
-
3
-
4
-
5
-
6
-
7
-
8
-
9
-
10
-
11
-
12
-
13
-
14
-
15
-
16
-
17
-
18
-
19
-
20
-
21
-
22
-
23
-
24
-
25
-
26
-
27
-
28
-
29
-
30
-
31
-
32
-
33
-
34
-
35
-
36
-
37
-
38
-
39
-
40
-
41
-
42
-
43
-
44
-
45
-
46
-
47
-
48
-
49
-
50
-
51
-
52
-
53
-
54
-
55
-
56
-
57
-
58
-
59
-
60
-
61
-
62
-
63
-
64
-
65
-
66
-
67
-
68
-
 69
69 -
 70
70 -
 71
71 -
 72
72 -
 73
73 -
 74
74 -
 75
75 -
 76
76 -
 77
77 -
 78
78 -
 79
79 -
80
-
81
-
82
-
83
-
84
-
85
-
86
-
87
-
88
-
89
-
90
-
91
-
92
-
93
-
94
-
95
-
96
-
97
-
98
-
99
-
100
-
101
-
102
-
103
-
104
-
105
-
106
-
107
-
108
-
109
-
110
-
111
-
112
-
113
-
114
-
115
-
116
-
117
-
118
-
119
-
120
-
121
-
122
-
123
-
124
-
125
-
126
-
127
-
128
-
129
-
130
-
131
-
132
-
133
-
134
-
135
-
136
-
137
-
138
-
139
-
140
-
141
-
142
-
143
-
144
-
145
-
146
-
147
-
148
-
149
-
150
-
151
-
152
-
153
-
154
-
155
-
156
-
157
-
158
-
159
-
160
-
161
-
162
-
163
-
164
-
165
-
166
-
167
-
168
-
169
-
170
-
171
-
172
-
173
-
174
-
175
 |
 |