Sony VGX-XL1 User Guide - Page 81
Start, Control Panel, Network Connections, Properties, Wireless Networks, Preferred Networks
 |
View all Sony VGX-XL1 manuals
Add to My Manuals
Save this manual to your list of manuals |
Page 81 highlights
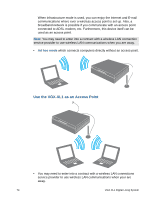
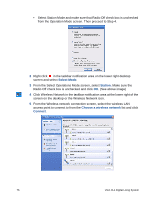
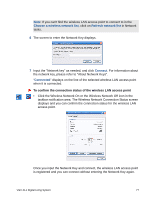
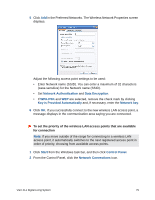
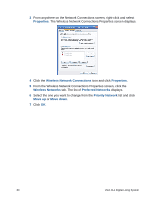
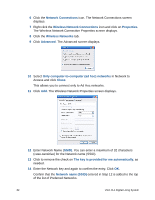
To confirm the individual information for the wireless LAN access point 1 Click Windows the Windows Start menu and then click Control Panel. 2 From the Control Panel, click the Network Connections icon. 3 From the wireless network device listed, right-click the device and select Properties. The Wireless Network Connections Properties screen displays. 4 Click the Wireless Networks tab. The list of Preferred Networks displays. 5 From the Preferred Networks list, select the network device you want to confirm and then click Properties. The properties screen is displays. Confirm the detailed information about the wireless LAN access point is correct. To create a new connection or switch connections You can create new location to connect to or switch connections to another wireless LAN access point with wireless LAN while connected. For additional information, please refer to Windows Help 1 Click the Windows Start button and then click Control Panel. 2 From the Control Panel, click the Network Connections icon. The Network Connections screen displays. 3 Right click the Wireless Network Connections icon and then click Properties. The Wireless Network Connection Properties screen displays. 4 Click the Wireless Networks tab. The list of Preferred Networks displays. 78 VGX-XL1 Digital Living System
-
 1
1 -
2
-
3
-
4
-
5
-
6
-
7
-
8
-
9
-
10
-
11
-
12
-
13
-
14
-
15
-
16
-
17
-
18
-
19
-
20
-
21
-
22
-
23
-
24
-
25
-
26
-
27
-
28
-
29
-
30
-
31
-
32
-
33
-
34
-
35
-
36
-
37
-
38
-
39
-
40
-
41
-
42
-
43
-
44
-
45
-
46
-
47
-
48
-
49
-
50
-
51
-
52
-
53
-
54
-
55
-
56
-
57
-
58
-
59
-
60
-
61
-
62
-
63
-
64
-
65
-
66
-
67
-
68
-
69
-
70
-
71
-
72
-
73
-
74
-
75
-
 76
76 -
 77
77 -
 78
78 -
 79
79 -
 80
80 -
 81
81 -
 82
82 -
 83
83 -
 84
84 -
 85
85 -
 86
86 -
87
-
88
-
89
-
90
-
91
-
92
-
93
-
94
-
95
-
96
-
97
-
98
-
99
-
100
-
101
-
102
-
103
-
104
-
105
-
106
-
107
-
108
-
109
-
110
-
111
-
112
-
113
-
114
-
115
-
116
-
117
-
118
-
119
-
120
-
121
-
122
-
123
-
124
-
125
-
126
-
127
-
128
-
129
-
130
-
131
-
132
-
133
-
134
-
135
-
136
-
137
-
138
-
139
-
140
-
141
-
142
-
143
-
144
-
145
-
146
-
147
-
148
-
149
-
150
-
151
-
152
-
153
-
154
-
155
-
156
-
157
-
158
-
159
-
160
-
161
-
162
-
163
-
164
-
165
-
166
-
167
-
168
-
169
-
170
-
171
-
172
-
173
-
174
-
175
 |
 |