Sony VGX-XL1 User Guide - Page 140
Which tool do I use?, Recon RAID, Go to Intel, Matrix Storage Console, Cancel - motherboard
 |
View all Sony VGX-XL1 manuals
Add to My Manuals
Save this manual to your list of manuals |
Page 140 highlights
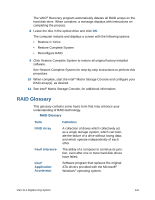
To install additional hard disk drives 1 Place all S-ATA disk drives into the drive holder inside the computer's chassis. (Limit of four drives.) 2 Connect one end of the S-ATA data cable(s) to the S-ATA connection, starting with Port-0 on the motherboard. Connect the data cables of any additional disks to Ports 1,2 and then 3. 3 Connect the other end of the S-ATA data cable to the corresponding S-ATA disk drive. 4 Connect the S-ATA power cable to the corresponding S-ATA disk drive. If your disk drive is equipped with two power connectors, connect the S-ATA power cable. Refer to the documentation supplied with your disk drive for details on proper power connections. When all disk drives are installed, you are ready to configure the RAID array. Which tool do I use? There are multiple tools and methods for configuring a RAID hard disk array. Sony recommends the use of the Intel® Matrix Storage Console, which can be accessed from Sony's VAIO® Recovery system or from the Intel® Web site. Note: If your computer has only one hard disk, a VAIO® Recovery message displays informing you that the Reconfigure RAID process cannot continue. A minimum of two disks are required to configure a RAID array. Click OK, then click Cancel or Back. • If you already have this program installed on your computer, go to Intel® Matrix Storage Console. • If you do not have this program installed on your computer, download and install the program before continuing. To download and install the Intel® Matrix Storage Console 1 Start the VAIO® Recovery program. See the VAIO® Recovery Guide located in VAIO® Support Central. 2 From the VAIO® Recovery menu screen, click Reconfigure RAID. The introductory screen for Reconfigure RAID appears. 3 Click Go to Intel® Matrix Storage Console. One of the following three events occurs: VGX-XL1 Digital Living System 137
-
 1
1 -
2
-
3
-
4
-
5
-
6
-
7
-
8
-
9
-
10
-
11
-
12
-
13
-
14
-
15
-
16
-
17
-
18
-
19
-
20
-
21
-
22
-
23
-
24
-
25
-
26
-
27
-
28
-
29
-
30
-
31
-
32
-
33
-
34
-
35
-
36
-
37
-
38
-
39
-
40
-
41
-
42
-
43
-
44
-
45
-
46
-
47
-
48
-
49
-
50
-
51
-
52
-
53
-
54
-
55
-
56
-
57
-
58
-
59
-
60
-
61
-
62
-
63
-
64
-
65
-
66
-
67
-
68
-
69
-
70
-
71
-
72
-
73
-
74
-
75
-
76
-
77
-
78
-
79
-
80
-
81
-
82
-
83
-
84
-
85
-
86
-
87
-
88
-
89
-
90
-
91
-
92
-
93
-
94
-
95
-
96
-
97
-
98
-
99
-
100
-
101
-
102
-
103
-
104
-
105
-
106
-
107
-
108
-
109
-
110
-
111
-
112
-
113
-
114
-
115
-
116
-
117
-
118
-
119
-
120
-
121
-
122
-
123
-
124
-
125
-
126
-
127
-
128
-
129
-
130
-
131
-
132
-
133
-
134
-
 135
135 -
 136
136 -
 137
137 -
 138
138 -
 139
139 -
 140
140 -
 141
141 -
 142
142 -
 143
143 -
 144
144 -
 145
145 -
146
-
147
-
148
-
149
-
150
-
151
-
152
-
153
-
154
-
155
-
156
-
157
-
158
-
159
-
160
-
161
-
162
-
163
-
164
-
165
-
166
-
167
-
168
-
169
-
170
-
171
-
172
-
173
-
174
-
175
 |
 |