Sony VGX-XL1 User Guide - Page 68
To Add / Upgrade a Hard Disk, Recorded video is saved to the C: drive, by default.
 |
View all Sony VGX-XL1 manuals
Add to My Manuals
Save this manual to your list of manuals |
Page 68 highlights
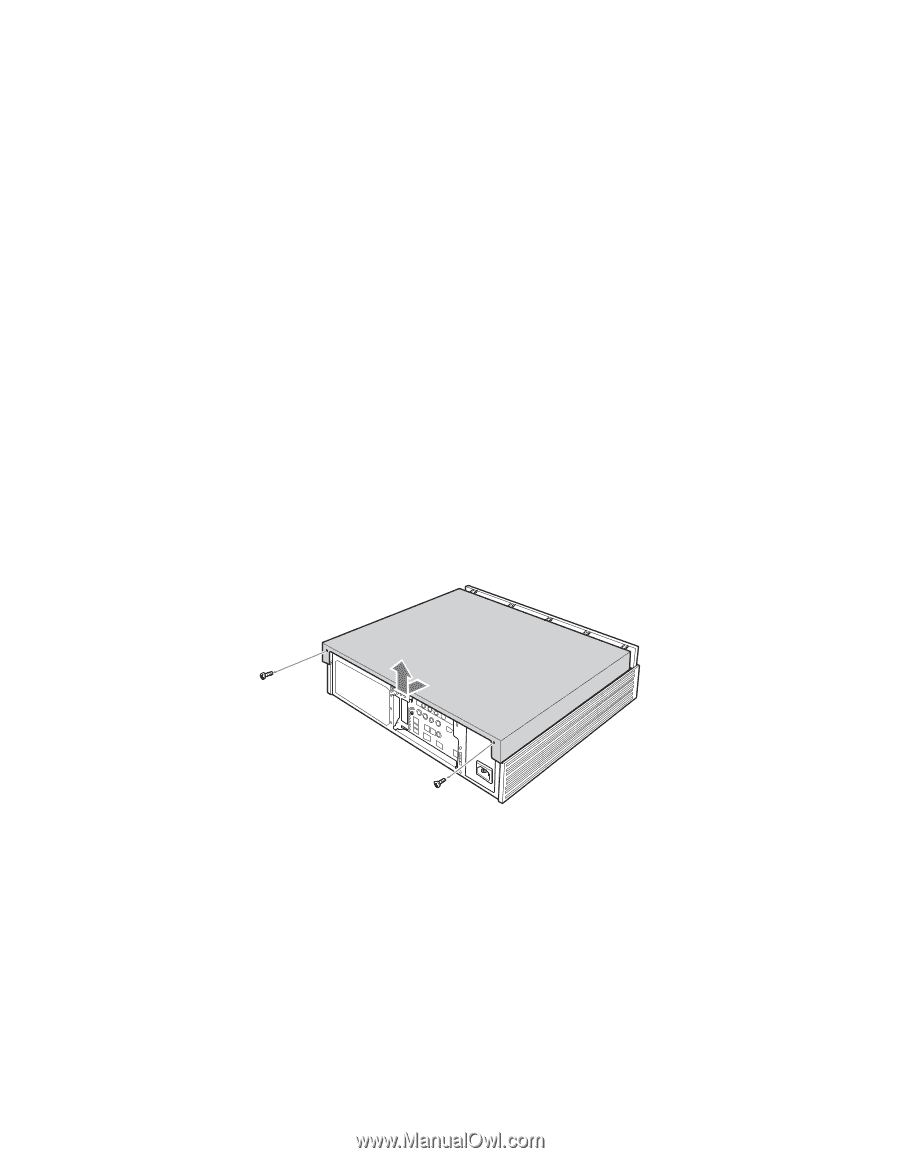
• Always install or remove a hard disk after pulling the power cord of this device or the peripheral device from the power outlet. Installing or removing the hard disk with the power cord still plugged in may cause damage to the hard disk, this device, or a peripheral device. • The inside of this device may be hot right after the power is turned off and may cause burns. Please wait to work until the device has cooled off. • The drive number for the upgraded hard disk may vary depending on the environment you use ("Local disk (E:)" or "Local disk (F:)" may be displayed). Also, please note that the drive number for the upgraded hard disk may change when recovering this device. • Recorded video is saved to the C: drive, by default. To Add / Upgrade a Hard Disk 1 Turn off the power to this device and all peripheral devices, and remove the power cord and all cables connecting peripheral devices. Some inside components may be hot. Wait approximately one hour before proceeding to work. 2 Remove the upper cover. Remove the screws in the rear and slide the cover off. VGX-XL1 Digital Living System 65
-
 1
1 -
2
-
3
-
4
-
5
-
6
-
7
-
8
-
9
-
10
-
11
-
12
-
13
-
14
-
15
-
16
-
17
-
18
-
19
-
20
-
21
-
22
-
23
-
24
-
25
-
26
-
27
-
28
-
29
-
30
-
31
-
32
-
33
-
34
-
35
-
36
-
37
-
38
-
39
-
40
-
41
-
42
-
43
-
44
-
45
-
46
-
47
-
48
-
49
-
50
-
51
-
52
-
53
-
54
-
55
-
56
-
57
-
58
-
59
-
60
-
61
-
62
-
 63
63 -
 64
64 -
 65
65 -
 66
66 -
 67
67 -
 68
68 -
 69
69 -
 70
70 -
 71
71 -
 72
72 -
 73
73 -
74
-
75
-
76
-
77
-
78
-
79
-
80
-
81
-
82
-
83
-
84
-
85
-
86
-
87
-
88
-
89
-
90
-
91
-
92
-
93
-
94
-
95
-
96
-
97
-
98
-
99
-
100
-
101
-
102
-
103
-
104
-
105
-
106
-
107
-
108
-
109
-
110
-
111
-
112
-
113
-
114
-
115
-
116
-
117
-
118
-
119
-
120
-
121
-
122
-
123
-
124
-
125
-
126
-
127
-
128
-
129
-
130
-
131
-
132
-
133
-
134
-
135
-
136
-
137
-
138
-
139
-
140
-
141
-
142
-
143
-
144
-
145
-
146
-
147
-
148
-
149
-
150
-
151
-
152
-
153
-
154
-
155
-
156
-
157
-
158
-
159
-
160
-
161
-
162
-
163
-
164
-
165
-
166
-
167
-
168
-
169
-
170
-
171
-
172
-
173
-
174
-
175
 |
 |