Stihl MS 162 Instruction Manual - Page 25
Before Starting Work, Assembling the Chain Saw
 |
View all Stihl MS 162 manuals
Add to My Manuals
Save this manual to your list of manuals |
Page 25 highlights
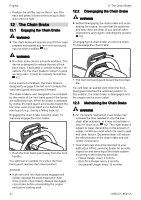
0000-GXX-1445-A0 9 Before Starting Work thoroughly cleaned or there is a change in its operating characteristics. ■ Use of parts that are not authorized or approved by STIHL may cause serious or fatal injury or property damage. - STIHL recommends that only identical STIHL replacement parts be used for repair or maintenance. ■ Improper storage can result in unauthorized use, damage to the chain saw and an increased risk of fire and other personal injury or property damage. - Shut off the engine and engage the chain brake by moving the front hand guard for‐ ward before storing. - Store the chain saw indoors in a dry, secure place that cannot be accessed by children or other unauthorized users. NOTICE ■ Always release tension on the chain after fin‐ ishing work. The chain contracts as it cools down. If it is not slackened, it can damage the drive shaft and bearings. Properly re-tension the chain before using the saw again. 9 Before Starting Work 9.1 Preparing the Chain Saw for Operation Before starting work: ► Mount the guide bar and saw chain, 10.2. ► Tension the chain, 10.3. ► Fill the chain oil tank, 11.2. ► Refuel the chain saw, 13.2. ► Check the chain brake, 16.1. ► Check the controls for proper function and condition, 16.2. 10 Assembling the Chain Saw 10.1 Cutting Attachment WARNING ■ If non-matching components are used, the cut‐ ting attachment will be damaged beyond repair after a short period of operation, and the chain could de-rail, resulting in serious or fatal personal injury. A cutting attachment consists of the chain, guide bar and chain sprocket. English 1 2 a 3 t=a 2 - The pitch (t) of the chain (1), chain sprocket and, if using a Rollomatic guide bar, nose sprocket must match. - The drive link gauge (2) of the chain must match the groove width of the guide bar (3). 10.2 Mounting and Removing the Guide Bar and Chain 10.2.1 Mounting the Guide Bar and Chain WARNING ■ The chain has many sharp cutters. If they con‐ tact your flesh, they will cut you, even if the chain is not moving, 5.4. Always wear heavy-duty work gloves when mounting or oth‐ erwise handling the chain, 5.3. To mount the guide bar and chain: ► Shut off the engine, 15.1. 0000097415_001 2 4 3 1 ► Unscrew the nut (1). ► Remove the chain sprocket cover (2). ► Turn the side chain tensioner (3) counter- clockwise until the tensioning gear (4) sits flush against the housing. 0000081120_002 0458-200-8621-A 25
-
 1
1 -
2
-
3
-
4
-
5
-
6
-
7
-
8
-
9
-
10
-
11
-
12
-
13
-
14
-
15
-
16
-
17
-
18
-
19
-
 20
20 -
 21
21 -
 22
22 -
 23
23 -
 24
24 -
 25
25 -
 26
26 -
 27
27 -
 28
28 -
 29
29 -
 30
30 -
31
-
32
-
33
-
34
-
35
-
36
-
37
-
38
-
39
-
40
-
41
-
42
-
43
-
44
-
45
-
46
-
47
-
48
-
49
-
50
-
51
-
52
-
53
-
54
-
55
-
56
-
57
-
58
-
59
-
60
-
61
-
62
-
63
-
64
-
65
-
66
-
67
-
68
-
69
-
70
-
71
-
72
-
73
-
74
-
75
-
76
-
77
-
78
-
79
-
80
-
81
-
82
-
83
-
84
-
85
-
86
-
87
-
88
-
89
-
90
-
91
-
92
-
93
-
94
-
95
-
96
-
97
-
98
-
99
-
100
-
101
-
102
-
103
-
104
-
105
-
106
-
107
-
108
 |
 |
